2.1.1.1.1.3. Using Eclipse to Develop With Makahiki on Vagrant
Using Eclipse to develop software with Makahiki is optional. However, .project and .pydevproject files are provided for the convenience of Eclipse users in the makahiki/makahiki directory.
This section assumes that the user has followed the instructions in Quick Start Guide: Makahiki on Vagrant to configure the Vagrant virtual machine.
Eclipse is an Integrated Development Environment (IDE) that requires Java. Eclipse is available for Windows, OS X, and Linux at http://eclipse.org.
You will not be able to run Django-based Python files on your host OS. You will need to run them in Vagrant after editing them in Eclipse on your host OS.
2.1.1.1.1.3.1. Installing Eclipse Prequisites
- Prequisites for the Eclipse installation are listed below:
Python 2.7.3 or later (but not Python 3): Required
Java JRE or JDK (Java 6 or newer): Required
Eclipse IDE (Eclipse 4.2 Juno or newer recommended): Required
PyDev Eclipse Add-on: Required
Configure Line Endings and Character Encodings: Required
- Eclipse Add-ons: Web, XML, Java EE and OSGi Enterprise Development (Optional)
- Eclipse Web Developer Tools (HTML/XHTML/CSS editors)
- JavaScript Development Tools (JavaScript editor)
- Eclipse Add-ons: Remote System Explorer (Optional)
- Remote System Explorer End-User Runtime
- Remote System Explorer User Actions
Set Hidden Files and Folders as Visible (Optional)
The following sections describe how to install or configure them.
2.1.1.1.1.3.1.1. Prerequisites: Python
Follow the instructions at Python.org to download and install a Python binary on your host OS. To develop software with Makahiki, you must install a version of Python that is 2.7.3 or higher (but not Python 3).
2.1.1.1.1.3.1.2. Prerequisites: Eclipse
Eclipse is an Integrated Development Environment (IDE) available from eclipse.org.
Follow the Eclipse.org installation instructions to install Eclipse (and Java if necessary) on your host machine.
Eclipse requires that the Java JRE (Java 6 or later) be installed on the host machine. The full Java JDK (which includes the JRE) is useful for Java development, but it is not required for Makahiki development.
2.1.1.1.1.3.1.3. Prerequisites: PyDev
PyDev is an Eclipse add-on that is required for Python development. Follow the Pydev.org installation instructions to install PyDev for your Eclipse installation.
2.1.1.1.1.3.1.4. Prerequisites: Configure Line Endings and Character Encodings
It is very important to set these preferences before editing any of the project files or creating new ones.
In Eclipse, go to Window –> Preferences.
Go to Preferences –> General –> Workspace. Click once on Workspace.
- In Workspace:
- Under “Text File Encoding,” select “Other,” then select “UTF-8” from the dropdown menu.
- Under “New Text File Line Delimiter,” select “Other,” then select “Unix” from the dropdown menu.
Click “Apply” when finished.
2.1.1.1.1.3.1.5. Prequisites: Web Development Add-Ons
The “Web, XML, Java EE and OSGi Enterprise Development” set of add-ons is optional. Makahiki uses Django and contains JavaScript, HTML, and CSS files, so general web development tools are useful.
- Open Eclipse. In the Help menu, select “Install New Software.”
- For the “Work with:” dropdown menu, select the “releases” URL that matches your Eclipse version. For Eclipse 4.2 Juno, for example, this would be “Juno - http://download.eclipse.org/releases/juno.”
- In the list of packages that appears below, click on the arrow to the left of “Web, XML, Java EE and OSGi Enterprise Development.” to expand the category. * The “Eclipse Web Developer Tools” provide HTML/XHTML/CSS editors. * The “JavaScript Development Tools” provide a JavaScript (.js) editor.
- Check the boxes for the add-ons you want to install.
- Click “Next,” then “Next.” You may need to agree to one or more licenses.
- Restart Eclipse when prompted. After the restart, any new editors or features will be installed and ready for use.
2.1.1.1.1.3.1.6. Prequisites: Remote Systems Explorer
The Remote Systems Explorer addons are optional. They are only required if you plan to connect to the Vagrant virtual machine from within Eclipse.
- Open Eclipse. In the Help menu, select “Install New Software.”
- For the “Work with:” dropdown menu, select the “releases” URL that matches your Eclipse version. For Eclipse 4.2 Juno, for example, this would be “Juno - http://download.eclipse.org/releases/juno.”
- Type “remote” in the search bar and wait for the search to finish. Check the boxes for the add-ons “Remote System Explorer End-User Runtime” and “Remote System Explorer User Actions.”
- Click “Next,” then “Next.” You may need to agree to one or more licenses.
- Restart Eclipse when prompted. After the restart, any new editors or features will be installed and ready for use.
2.1.1.1.1.3.2. Import Makahiki as an Eclipse Project
Your Vagrant virtual machine and its .vagrant folder should be located at the top level of the cloned makahiki repository, where the Vagrantfile is.
Importing the makahiki directory as an Eclipse project when the makahiki directory is also the Vagrant shared directory allows you to modify Makahiki source files on your host machine, then deploy the changes in your Vagrant virtual machine immediately.
Open Eclipse.
When prompted to select a workspace, click “Browse.” In the file system’s browser (Windows Explorer, OS X Finder, etc.), select the directory that you cloned the Makahiki repository into earlier, then click “OK.”
For example:
- Makahiki was cloned into: C:/Users/Tester/Vagrant
- Workspace directory should be: C:/Users/Tester/Vagrant.
- Eclipse will open. In the menu, click File –> Import.
- 3a. Click the arrow to expand “General,” then select
“Existing Projects Into Workspace.” Click “Next.”
- 3b. Uncheck the “Copy Projects into Workspace” checkbox.
Select the makahiki/makahiki directory as the root directory.
For example:
- Makahiki was cloned into: C:/Users/Tester/Vagrant
- Project root directory should be: C:/Users/Tester/Vagrant/makahiki/makahiki
3c. Check the checkbox for “makahiki” when it appears. Click “Finish.”
Assuming that you installed PyDev, you will receive the warning: “It seems that the Python interpreter is not currently configured.” Select “Auto config” if your Python interpreter is on your operating system’s PATH. Otherwise, use “Manual config” to select it manually. These instructions assume you selected “Auto config.”
If you selected “Auto config,” you will get a “Selection needed” popup. The defaults are usually fine. Click “OK” to continue.
You will be shown the “Interpreter - Python” menu. Click “Apply” to configure the Pythonpath for Eclipse.
If you need to change these libraries later, go to Window –> Preferences –> PyDev –> Interpeter - Python, and select the “Libraries” tab.
2.1.1.1.1.3.3. Opening an SSH Session in Eclipse
If you have installed the Remote System Explorer addons, you can start an SSH session to the Vagrant virtual machine from within Eclipse. The following steps involve the Remote System Explorer perspective.
In the Perspectives toolbar (upper-left-hand corner), click “Open Perspective.” Select “Remote System Explorer.”
If you want to view your project files, you can switch back to the PyDev perspective, or expand the “Local” –> “Local Files” directory tree in the Remote Systems tab to find the “makahiki” directory.
2.1.1.1.1.3.3.1. Start or Resume Vagrant in a Local Shell
If you previously started your Vagrant virtual machine with vagrant up or vagrant resume, you can skip this subsection.
In the “Remote System Explorer” tab, go to Local –> Local Shells. Right-click Local Shells and click “Launch Shell.”
A “Remote Shell” tab will open. It runs the command shell on your host machine, and commands are entered in the “Command” text field. The current directory will be the directory you installed Eclipse into.
Switch to the top-level “makahiki” directory:
> cd <path-to-makahiki>/makahiki
Check the virtual machine’s status:
> vagrant status
If your Vagrant virtual machine is shut down, start it:
> vagrant up --no-provision
If your Vagrant virtual machine is suspended instead, resume operation:
> vagrant resume
2.1.1.1.1.3.3.2. Define and Start an SSH Session
In the “Remote Systems” sidebar, click the button labeled “Define a connection to remote system.”
In the “New Connection” popup, click “SSH Only” then click “Next.”
Set the “Host name” to 127.0.0.1. Set the “Connection name” to anything you like. Click “Finish.”
The connection you defined will appear in the sidebar. Click the black arrow to the left of it to expand it.
Right-click “SSH Shells” then click on “Properties.”
Click “Subsystem” in the “Properties for Ssh shells” popup. Specify “Port” as “2222,” and “User ID” as “vagrant.” When finished, click “OK.”
Right-click “Ssh Terminals,” then click “Connect.” Use the password “vagrant” when prompted.
If you see a warning similar to the below example, click “Yes” to continue:
The authenticity of host 'LOCALHOST' can't be established.
RSA key fingerprint is e6:ad:1e:ee:15:53:7d:a6:ee:7c:aa:04:7a:ad:9a:9a.
Are you sure you want to continue connecting?
If you see a popup similar to the below example, click “Yes” to continue:
C:\Users\<username>\.ssh\known_hosts does not exist.
Are you sure you want to create it?
In the Remote Systems sidebar, right-click “Ssh Terminals” and click “Launch Terminal.” This will open an SSH session terminal under “Terminals.”
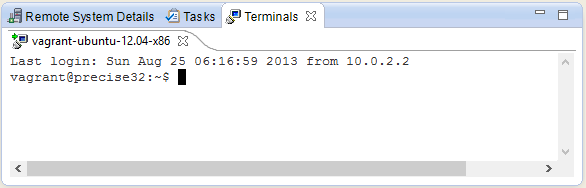
The SSH session can be used to run Makahiki scripts and the Makahiki web server, like a normal SSH session. Using “exit” or “logout” will close the session, but pressing Enter will launch a new session. Close the “Terminals” tab when you are done.
Note
As of Eclipse Juno, there is a bug in the Terminals display of the Remote Systems Explorer. Pressing backspace will cause the terminal prompt to disappear. Any text before your cursor position will also disappear. The text remains typed in the virtual machine.
2.1.1.1.1.3.4. Enabling Makahiki Code Completion in Eclipse PyDev
2.1.1.1.1.3.4.2. Pythonpath and Code Completion Settings in Eclipse PyDev
Open Eclipse. Switch to or open the PyDev perspective if you are not in it.
In the PyDev perspective, click on Window –> Preferences –> PyDev –> Interpreter - Python, then select the “Libraries” tab.
Click on “New Folder.”
In the “New Folder” window, click the white right-pointing arrow to expand the directory tree. In the directory tree, browse to <path-to-makahiki>/makahiki/makahiki/dist-packages. Click on the directory to highlight it, then click “OK.”
In the main “Interpreter - Python” window, click “Apply” to rebuild Eclipse’s System Pythonpath.
In the PyDev perspective, click on Window –> Preferences –> PyDev –> Editor –> Code Completion. These options may be useful:
- Request completion on ‘.’?
- Request completion on all letter chars and ‘_’?
To test the code completion, open any Python file. At the top of the file, begin typing this line:
from django.core.cache import File
When the code completion popup opens, press Control+Space to switch from “templates” to “default completions.” “Default completions” gives you a list of suggested package modules, while “templates” gives you common Python keywords. Use Control+Space to cycle between the two.
If imports are still marked as not found, you may need to refresh the project before changes to the Pythonpath take effect. Right-click the top-level makahiki folder in Eclipse, and click “Refresh.”
Warning
- Code completion does not always mean that a Python script will run correctly or safely in Eclipse on the host machine (as opposed to the virtual machine).
- Environment variables may not have the right values on the host OS.
- Shell commands and system calls may fail if your host OS is different from the virtual machine OS.
- If your host OS is Linux / Unix-based (especially Ubuntu or any distro that is based on Debian) and has some of the same applications, running any script in Eclipse that makes system calls may result in the script’s effects being applied to your host operating system.
2.1.1.1.1.3.5. Remote Debugging in Eclipse PyDev
The PyDev addon contains a Remote Debugger feature that allows programs started outside of Eclipse to be debugged from within Eclipse. This allows Python scripts on the virtual machine to be debugged in Eclipse on the host machine.
For more information about the remote debugger, refer to the PyDev remote debugger documentation.
Warning
Using the Remote Debugger requires the process running the script on the virtual machine to be able to communicate with PyDev on port 5678.
Windows users, depending on their settings, may need to disable the Windows Firewall completely for the Remote Debugger to work. Disabling the Windows Firewall requires administrative privileges. It is a security risk and should ideally be done on a machine not connected to any networks (or at least any unsecured and/or public networks).
Similarly, Linux and OS X users may need to change their firewall settings if they want to use this feature. This usually requires administrative privileges on the host machine.
2.1.1.1.1.3.5.1. Remote Debugger Demonstration
Run the demonstration class to see the remote debugger in action:
On the host machine, look for the directory you installed Eclipse into (the directory that contains the “eclipse” directory). In this directory, navigate to eclipse/plugins/.
Copy the directory with a name of the form org.python.pydev_<version number X.X.X>.<nine digits representing build date> (e.g., org.python.pydev_2.7.5.2013052819) to the <path-to-makahiki>/makahiki/makahiki directory.
In Eclipse, open the Debug perspective.
In the top button menu bar (below the menu bar that contains “File”), search for a bug icon with a “P” next to it. The mouseover text for the icon is “PyDev: Start the pydev server”:
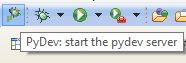
Click this. In the Debug tab, icons for the “Debug Server [Python Server]” will appear. In the Console tab, the phrase “Debug Server at port: 5678” will appear.
Switch to the PyDev perspective. Navigate to makahiki/makahiki/remote-debugger-demo.
Open pydevd_demo.py. This is an example file that uses the PyDev debugger.
Look at the two import statements at the beginning of the file. These statements must be added to any file in this project that uses the remote debugger:
import sys;sys.path.append(os.pardir + os.sep + r'org.python.pydev_2.7.5.2013052819\pysrc')
import pydevd
Check that the path to org.python.pydev_#.#.#.##########pysrc matches the relative path from pydevd_demo.py to the directory copied into makahiki/vagrant in Step 2. Edit it if it does not.
Look for the “pydevd.settrace().” Each occurrence of pydevd.settrace() acts as a breakpoint when the remote debugger is used.
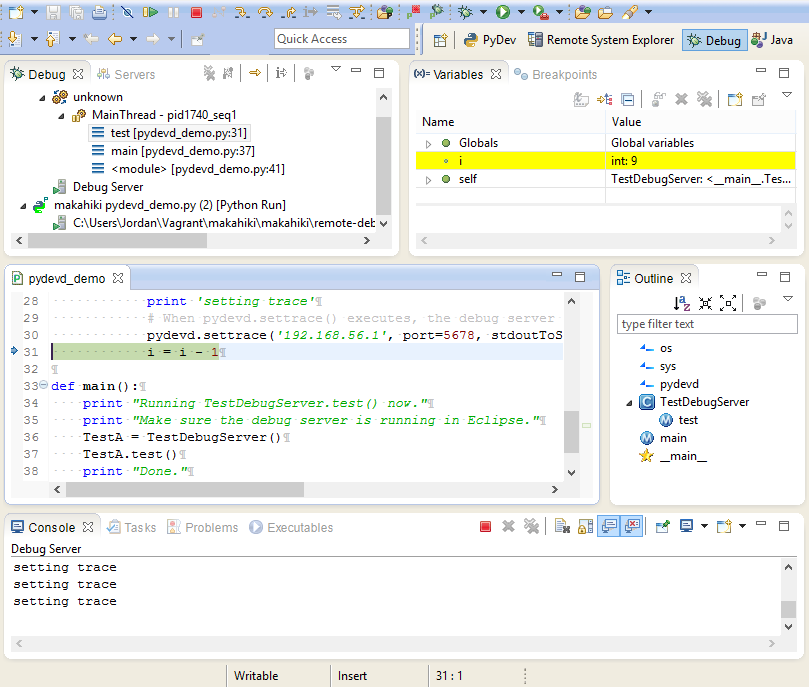
Switch back to the Debug perspective. Run pydevd_demo.py in Eclipse.
pydevd_demo.py will appear under a item called “MainThread.” Note the value for “i” that appears in the Variables tab. Step through the program using the debugger; “i” will be decremented as the loop runs. Output from the program will appear in the Console tab.
Leave Eclipse open in the Debug perspective. Open a Command Prompt or Terminal, and SSH into your Vagrant virtual machine:
> vagrant ssh
In Vagrant, switch to /vagrant/vagrant and run pydevd_demo.py:
vagrant@precise32:~$ cd /vagrant/vagrant
vagrant@precise32:/vagrant/vagrant$ python pydevd_demo.py
You should see the same debugging information appear as when you ran the program locally. If it does not work, you may see Errno 110:
socket.error: [Errno 110] Connection timed out
If you see Errno 110, check your firewall settings.
When you are finished, right-click the Debug Server and click “Terminate and remove” to stop the server and remove it from the tab.
If this does not work, you may need to set the location of the file to be tested in pydevd_file_utils.py.
- Navigate to the org.python.pydev_<version> directory you copied into makahiki/makahiki earlier, then go to the pysrc directory. Open the pydevd_file_utils.py file.
- Follow the instructions at the beginning of the file to edit the PATHS_FROM_ECLIPSE_TO_PYTHON variable’s value to match the location of your file on the host machine and on the virtual machine.
2.1.1.1.1.3.6. Adding Remote Debugging Code to a Python File
To add the remote debugging functionality in pydevd_demo.py to any Python file:
Edit the file so that it includes two import statements: one to import the pysrc directory, and one to import pydevd.
Add pydevd.settrace() wherever you would insert a breakpoint in normal Eclipse debugging. It can have up to 4 parameters set:
The first parameter, the IP address, must match the .1 address of the host-only network configured in the Vagrantfile.
- The port, 5678, is the remote debugger’s default port. To edit this setting, go to Windows –> Preferences –> PyDev –> Debug.
- Edit “Connect timeout for debugger (ms)” to change the timeout setting.
- Edit “Port for remote debugger” to change the port. Click “Apply” when finished.
stdoutToServer sends standard output to the Eclipse debug server.
stderrToServer sends standard error output to the Eclipse debug server.
Start the Debug Server in Eclipse.
Run the Python file that will be debugged.
When you are done debugging, remove the import statements and the calls to pydevd.settrace().
If you experience problems other than Errno 110, you may need to edit PATHS_FROM_ECLIPSE_TO_PYTHON in pydevd_file_utils.py. If this is the case, you will need to change the file paths every time you debug a different file.