2.3.6.3. Design the Smart Grid Game
2.3.6.3.1. About the Smart Grid Game
Makahiki provides the Smart Grid Game (SGG) to support “gamified” delivery of educational experiences. Players use its grid interface to discover “actions” they can perform. Successful completion of an action earns the player a variable number of points depending upon the difficulty of the action, and can potentially “unlock” additional actions in the SGG. There are four types of actions: activities, commitments, events, and creative. As a challenge designer, your task is to design an SGG that contains educational experiences suitable for your players, and also design the “path” that players take through the SGG through the unlocking of new actions.
The following screen image shows a typical Smart Grid Game interface for players:
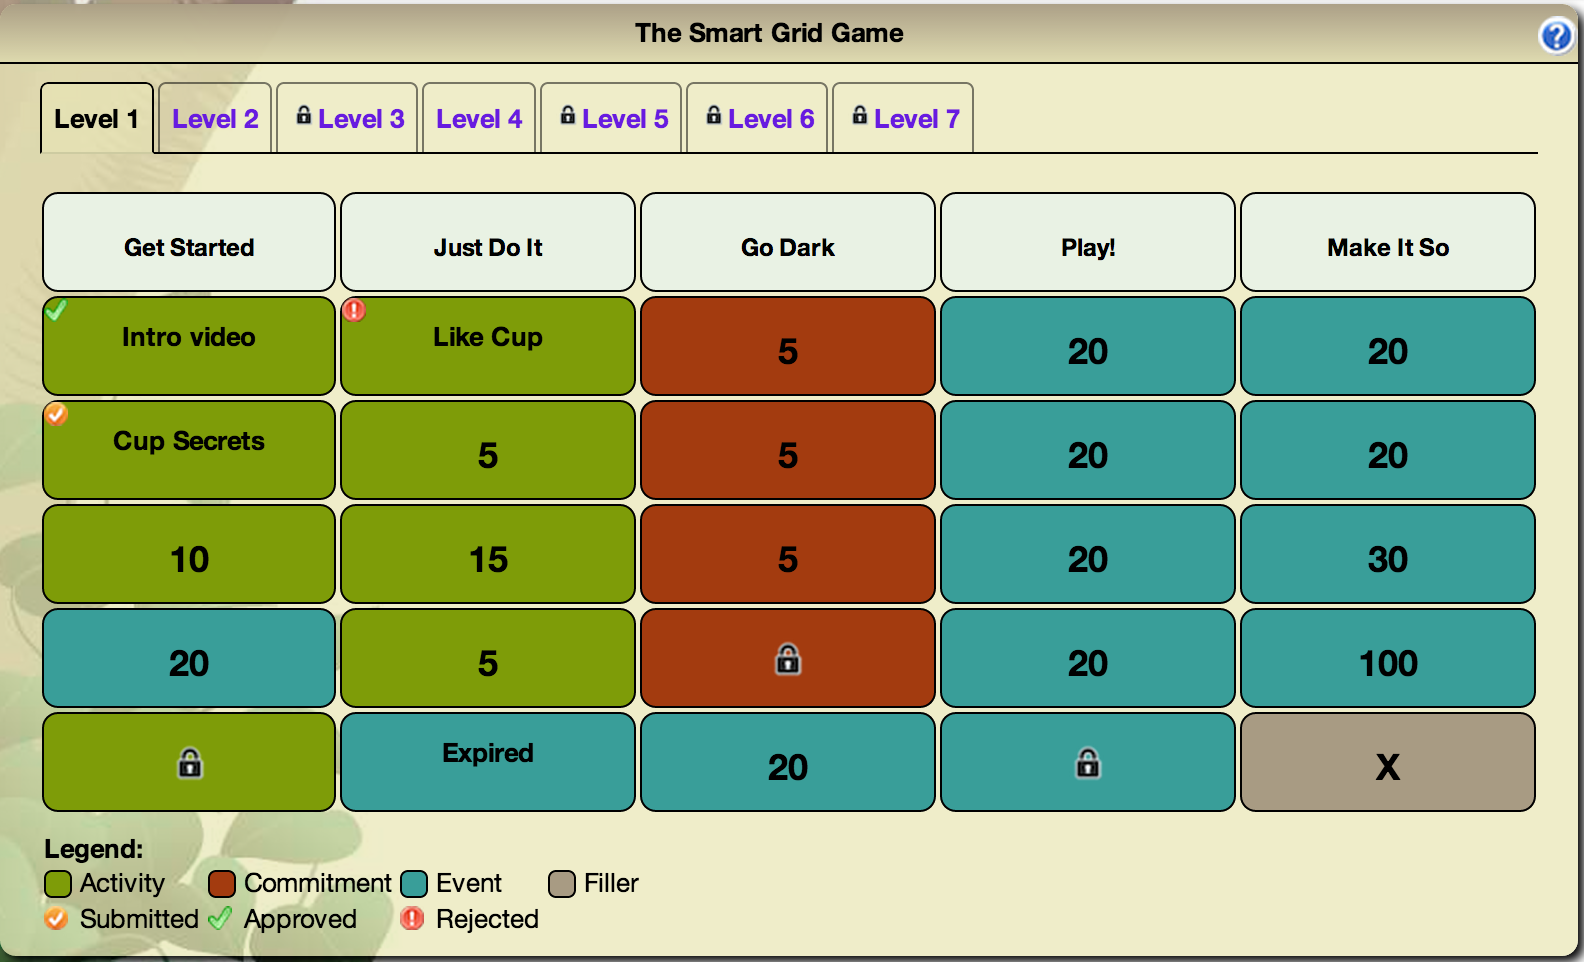
This image reveals several important aspects of the SGG:
Levels. Each Smart Grid Game can have from 1 to 7 “Levels”. (More than 7 Levels becomes awkward when viewing the game on a mobile device.) The screen image above has 7 levels. In typical SGG designs, players begin with access only to the first Level. Higher Levels become unlocked for a player either because they completed a lower level or because a Level is designed to unlock automatically when a given date is reached during the challenge.
Actions. The cells underneath a category label provide access to “Actions”. There are several action types: Activity, Commitment, Event, Filler. The color of the cells indicates their action type. In the screen image, each of the five categories has five Action cells, so this Level of this Smart Grid Game has a total of 25 Actions. In order to create a rectangular grid, designers can also create “filler” actions, which occupy a space in the grid but cannot be otherwise manipulated by players. There is one “filler” action in the lower right corner.
State of play. Cells are “decorated” with information that indicates the state of play.
- If an action is unlocked and thus available for the player, then the cell provides a number indicating the point value of that action if completed. In the image above, unlocked cells indicate actions ranging in value from 5 to 100 points.
- If an action is not yet unlocked, then instead of a number, it shows a lock icon.
- If the cell corresponds to an an event that has already occurred, it is labeled as “Expired”.
- If the action has been submitted or completed by the player, then instead of a point value, the name of the action appears in the cell. For example, the image above shows that this player has completed the “Intro Video” action.
- Finally, actions are typically in one of three states: submitted, completed, or rejected (in which case the player can resubmit a revised answer to get full credit.) Small icons (orange, green, or red) indicate this state.
2.3.6.3.2. About actions
2.3.6.3.2.1. Activity
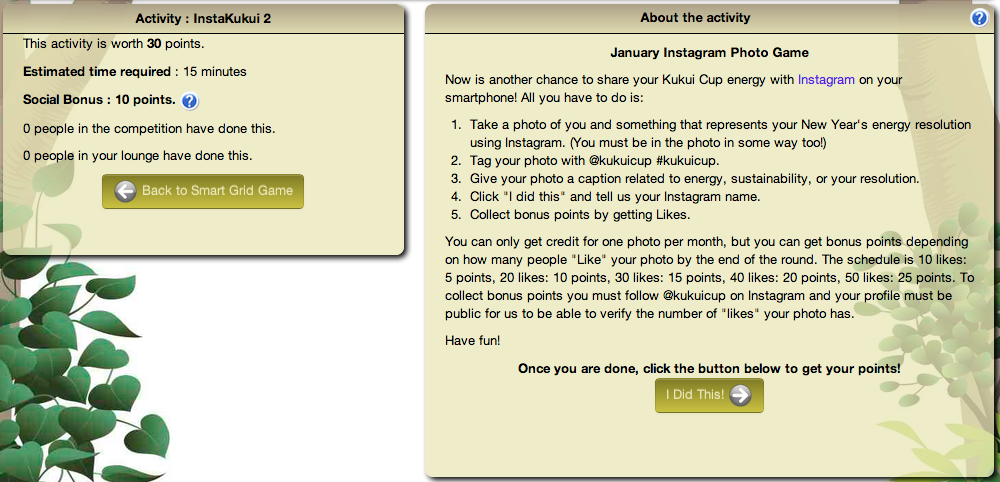
Activities are the most basic action available in the Smart Grid. In order to get points for an activity, a player must input a response to the system, which is reviewed and approved or disapproved by administrators. These responses can be a short textual answer or an uploaded picture. If a submission is approved, the player receives the points for their submission. Otherwise, the system notifies the player that their submission was not approved, along with a comment (writte by an administrator) explaining why it was rejected. The player can change and resubmit their response and still earn the full point value for that task. The following figure illustrates a sample activity:
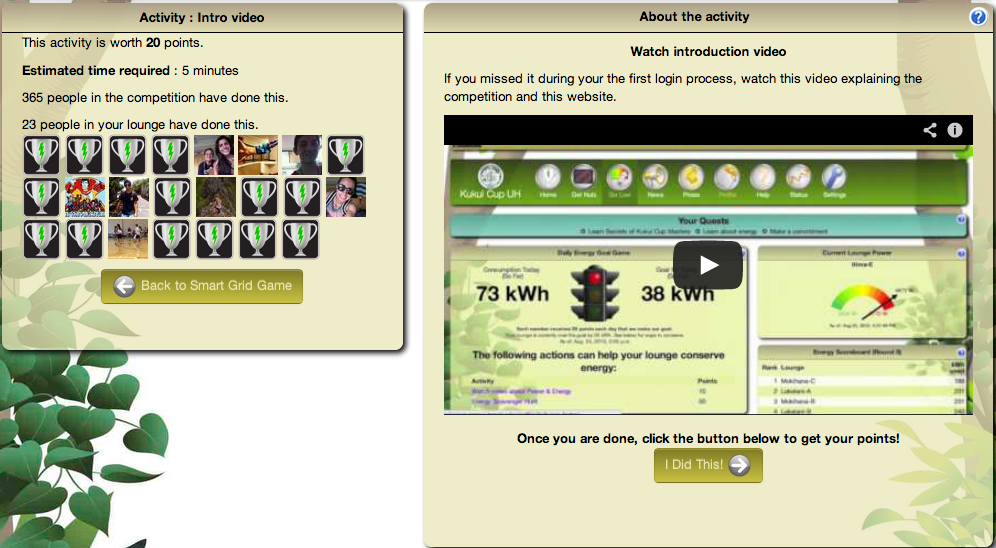
Sample activity in the Smart Grid Game
2.3.6.3.2.2. Commitment
Commitments are pledges that the player will carry out a specific action for a specific amount of time (typically 5 days). Examples include: reducing shower time, taking the stairs, and turning off the lights when leaving a room. Unlike activities, commitments are not easily verifiable, and so they are usually designed with fewer points than activities. Furthermore, a player can only enter into five commitments at any given time. After the commitment period is up, the player can declare that they completed the commitment and immediately earn the associated points. They can then enter into another commitment, including the one they just completed. The following figure illustrates a sample commitment:
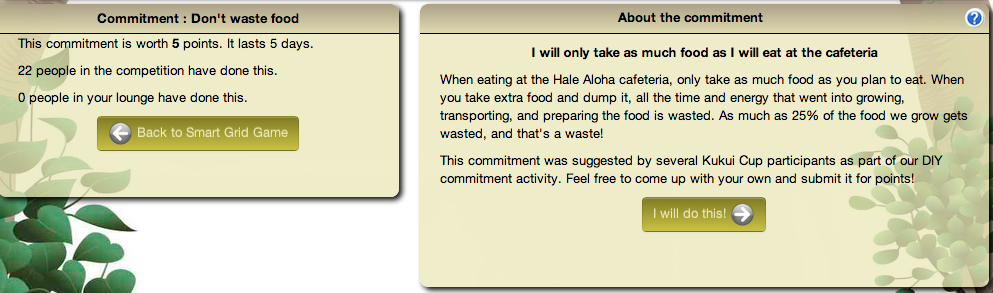
Sample commitment in the Smart Grid Game
2.3.6.3.2.3. Events
Events are actions tied to real world meetings. To help organizers gauge interest in events, players can earn points by signing up in advance. Players that do this (and then actually attend the event) earn a signup bonus (typically 2 points). Players can also set up a reminder that is sent to their email and/or their mobile phone before the meeting takes place. At the event, a challenge administrator provides players with “attendance codes” printed on slips of paper that can be later entered in the system by the player to get their points. (The paper slips provide a form of verification that the player physically attended the event.) Attendance codes are generated by Makahiki and can only be used once. To discourage players from signing up and not attending, a penalty (typically 2 points) is assessed to players who do not submit an attendance code. If the player submits an attendance code for the event after receiving this penalty, the penalty is reversed. The following figure illustrates a sample event:
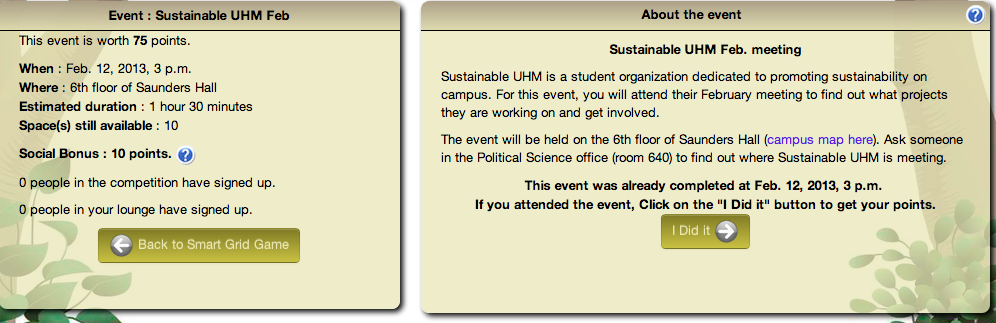
Sample event in the Smart Grid Game
2.3.6.3.2.4. Creative
Creative actions enable players to exercise their artistic talents. These are often worth a variable number of points, depending upon the effort made by the player and the quality of the outcome (as judged by administrators). Examples of creative activities include: make a poem, make a video, write a letter to the editor, write a song, and create a photo blog. The following figure illustrates a creative activity:
Sample creative activity in the Smart Grid Game
2.3.6.3.3. Designing your Smart Grid Game
Designing the Smart Grid Game is one of the most complicated parts of the Kukui Cup planning process, because the Smart Grid Game is the “portal” through which players get access to the various “actions” (activities, commitments, events, and creatives) of the Kukui Cup: in short, virtually all of the “real world” experiences.
We recommend that you begin by “roughing out” the design of your smart grid game on paper (or, even better, in a spreadsheet). Once you have designed the preliminary set of actions and their locations in the grid, you can implement that design in the system.
Note
We are working on a SGG “designer” interface with drag-and-drop functionality that will greatly simplify this process. We hope to release it in Q2 of 2013.
2.3.6.3.3.1. Step 1: Design your initial content
To design an SGG, the first step is to determine the initial content for your challenge, which means answering the following questions:
- What are the events (if any) in your challenge?
- What are the commitments (if any) in your challenge?
- What are the videos (if any) in your challenge?
- What are the non-video activities in your challenge?
- How many points is each activity worth?
- For video and non-video activities, what are the verification questions?
To help bootstrap your design, we have created an action library of almost 100 actions that you can use for inspiration. They are organized as a Google Spreadsheet with various subsheets to show different perspectives on the information. The following figure shows a screen image of the spreadsheet. Here is a link to the action library.
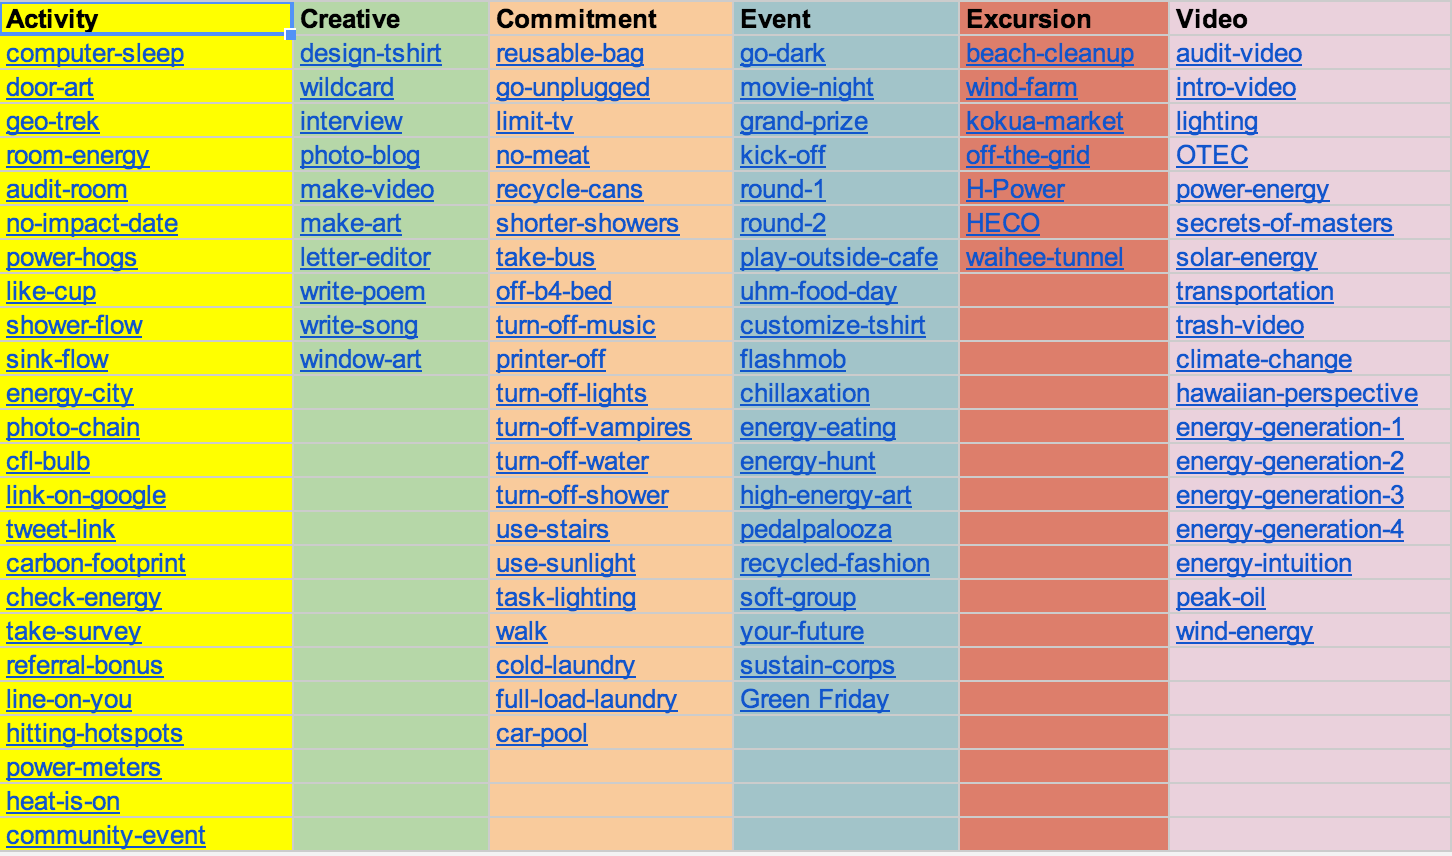
A screenshot of the action library
The Library versions of these actions are also provided in Makahiki’s Smart Grid Game Designer on the left-hand side, so you don’t have to retype all of the information if you would like to use one or more of these actions in your challenge.
To complete this design step: create a document that provides the titles, descriptions, point values, and verification questions for all of your proposed content. If you are reusing actions from the library, then just list the title and any attributes that you wish to change.
2.3.6.3.3.2. Step 2: Design the “paths” that players take through the SGG
To make your SGG more interesting to players, and more pedagogically sophisticated, you will want to define “paths” through the content. In most cases, when a new player sees the SGG for the first time, there should only be a few actions available to them—possibly only one. All of the rest should be “locked”.
For this design step, start by specifying the initial, “seed” actions in your SGG: those that are always unlocked.
Next, specify the actions that should be unlocked once one or more of the seed actions are successfully completed by players. The content of these new actions can now potentially depend upon the information presented in the initial actions, since the game itself guarantees that players will have completed “dependent” actions before being able to see the new action.
An alternative way to specify that an action should be unlocked is by time and date. For example, you may want to make events and excursions visible to participants starting five days before their actual occurrence. You can also combine the two approaches. For example, you might want to make an event available only to those players who have successfully completed certain actions. In this case, it gets unlocked for a player only if both the date/time has been reached, and the player has completed the actions.
To complete this design step: Augment the document created in Step 1 with the dependencies associated with each action. If an action has no dependencies, it is a “seed” action and will be always unlocked.
2.3.6.3.3.3. Step 3: Decide which activities support the “social bonus”
The social bonus is an optional attribute of any Smart Grid Game action which awards extra points if the player has done the action with someone else. Examples of actions which commonly include a social bonus are: attending an event, recording a song related to energy, or measuring a shower water flow rate.
When a player submits a response for a action that supports the social bonus, the player can provide the email address another player who jointly completed the action. Once the other player also completes the task, the social bonus is awarded. Social bonuses are not bi-directional; if the second player doesn’t provide the first player’s email address, only the first player will get the social bonus.
To complete this design step: Decide which actions should include the social bonus, and augment your document with this information.
2.3.6.3.3.4. Step 4: Design the layout
Now that you have the initial set of actions and their dependencies, it is time to figure out how they should appear in the grid. A spreadsheet program is quite useful in this process, or you can use graph paper, or even a piece of paper in which you have drawn vertical lines to create a grid. In any case, you need to decide on the column labels, and the column of actions underneath each category. If you are designing a game with multiple Levels, then you need to decide on the categories and actions for each level.
Note that you frequently don’t have a “perfect” number of actions to create a rectangular grid. To solve this problem, the SGG allows you to specify “Filler” cells in order to create a rectangular grid. For example, let’s say you want to define a Level with 17 actions. You could create a 4 x 5 grid with your 17 actions and 3 additional “Filler” actions. While the SGG allows you to create grids with a “ragged” bottom edge, we think that a rectangular grid is aestheticly more pleasing. In addition, Filler cells can be later replaced by actual actions, enabling you to easily add content in the middle of a challenge without changing the structure of the grid.
Here are some layout heuristics we have discovered through the design and execution of our own challenges:
- Initial, unlocked (seed) actions generally go in the first Level, in the first column. The intro video (used during the “first login wizard”) is typically the first action in the upper left corner.
- For best display on mobile devices, define no more than 5 columns per Level.
- To simplify addition of actions after the challenge is started, it is useful to always have a few Filler actions on each Level.
- If you are creating a challenge with multiple rounds, you might want to have one Level per round, and have each Level unlock at the start of its corresponding round.
To complete this design step: Create a grid using a spreadsheet or paper that contains your layout. Each action should appear once and only once on the grid. If you define multiple Levels, you need to create a separate grid for each Level.
2.3.6.3.4. Implementing your Smart Grid Game with the Designer
Once you have finished with the design of your Smart Grid Game, it is time to implement it in the system. The Smart Grid Game Designer introduces a new concept Draft Grids. Drafts are Smart Grids that are just for planning or development. They allow you to explore different layouts and paths through the Smart Grid Game. Since the Smart Grid is live, players can see the Smart Grid. If the designer want to change the Smart Grid Game they shouldn’t directly edit the Smart Grid since the players can see any changes in real time.
- The Library holds the generic actions without any dates or locations. The Library is a resuable set of actions for any Kukui Cup.
- The Designer holds specific draft grids that can be published to the Smart Grid Game. Designer Actions are more specific than Library Actions since they often have real dates and locations. The Designer Actions should be tailored to your specific KukuiCup. Designers can adjust the Designer Grid, adding or removing actions, columns and levels and players will not see the changes until they are published.
Makahiki has a Smart Grid Game Designer (Designer) to help you build your Smart Grid Game. To get to the Designer click on the “sgg conf” button on the Navigation bar. The right hand most icons shown the figure below.

If there are no Draft grids when you start the Designer Makahiki presents you with the ‘New Draft’ choice dialog shown below when you click on “New Draft.”
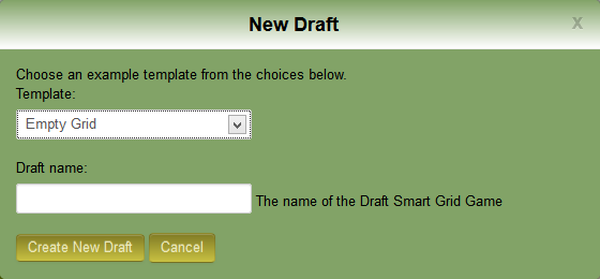
Warning
The names of Draft grids cannot contain spaces or uppercase letters.
You can choose from five different example Smart Grid Game templates, Empty Grid, Demo, Kukui Cup/UH12, and test. These templates provide a variety of different Smart Grid Game examples.
- Empty Grid is a single level empty grid, wide open for your creativity.
- Demo is a three level grid, with one virtual event.
- Kukui Cup/UH12 is the grid used in the 2012 Kukui Cup at the University of Hawaii, Manoa. It has seven levels and was designed to run for 9 months.
- Test is four level grid used in some of the development tests.
Once the draft is created you will see the Designer. Designer has two sections, Designer Widget and the Grid Consistency Checker (GCC) tools.
2.3.6.3.4.1. Designer Widget
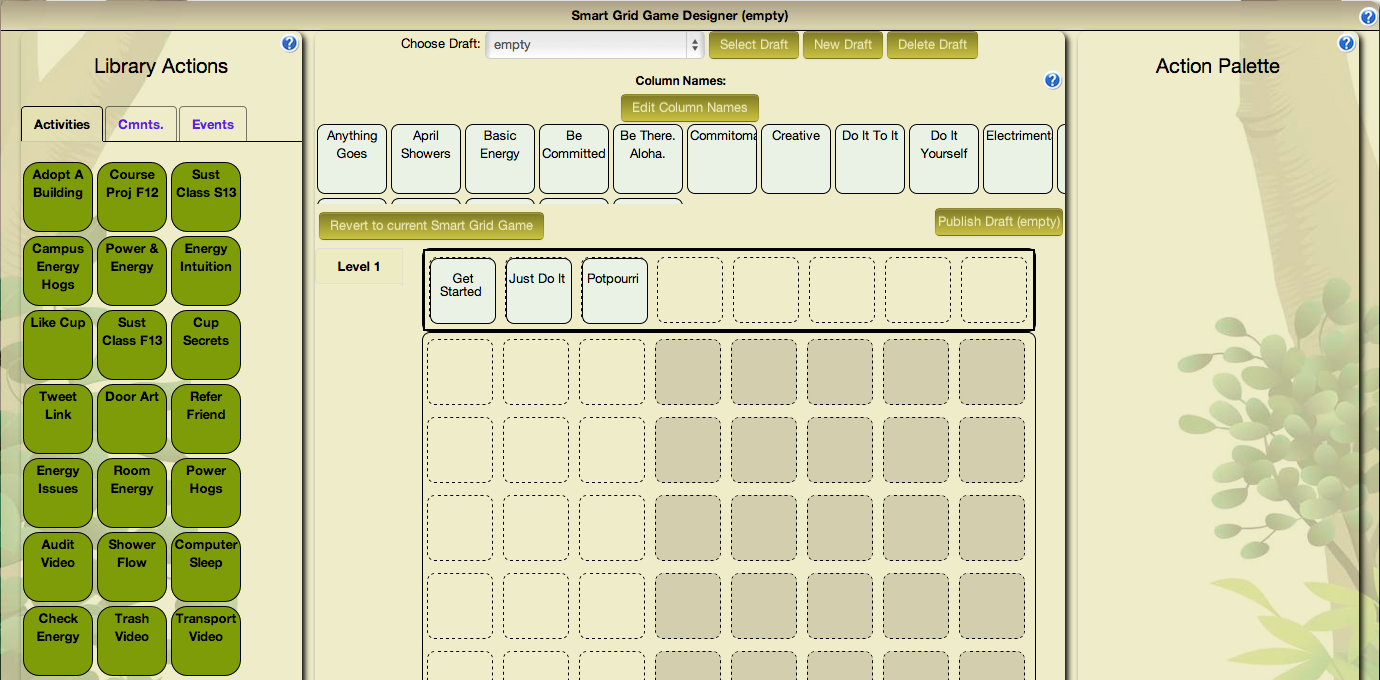
The first section is the Smart Grid Game Designer Widget shown in the next figure.
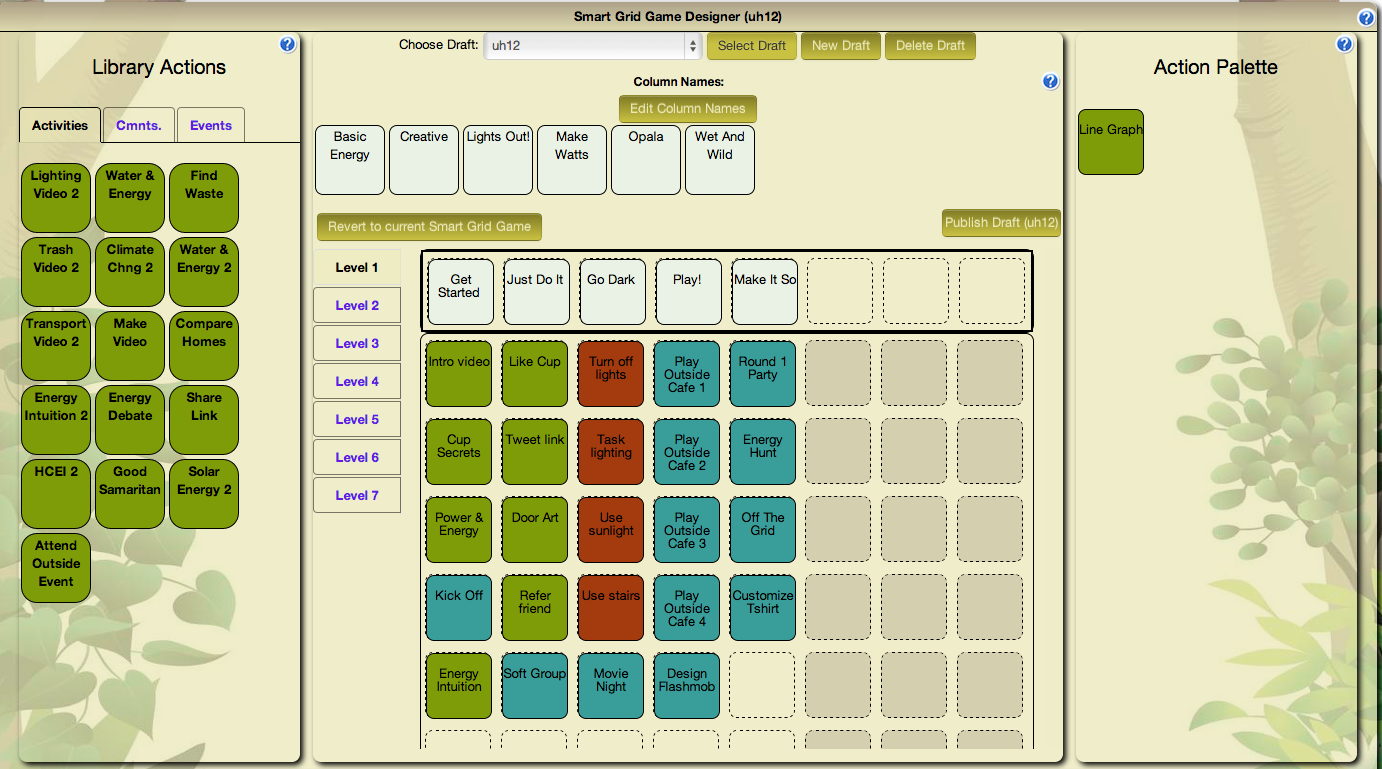
The Designer Widget has three columns, Library Actions, Designer Grid, and Palette. The Library Actions Column holds a library of Activities, Commitments, and Events. These actions are divided into three tabs, Activities, Cmnts (Commitments), Events, shown in the next figure.
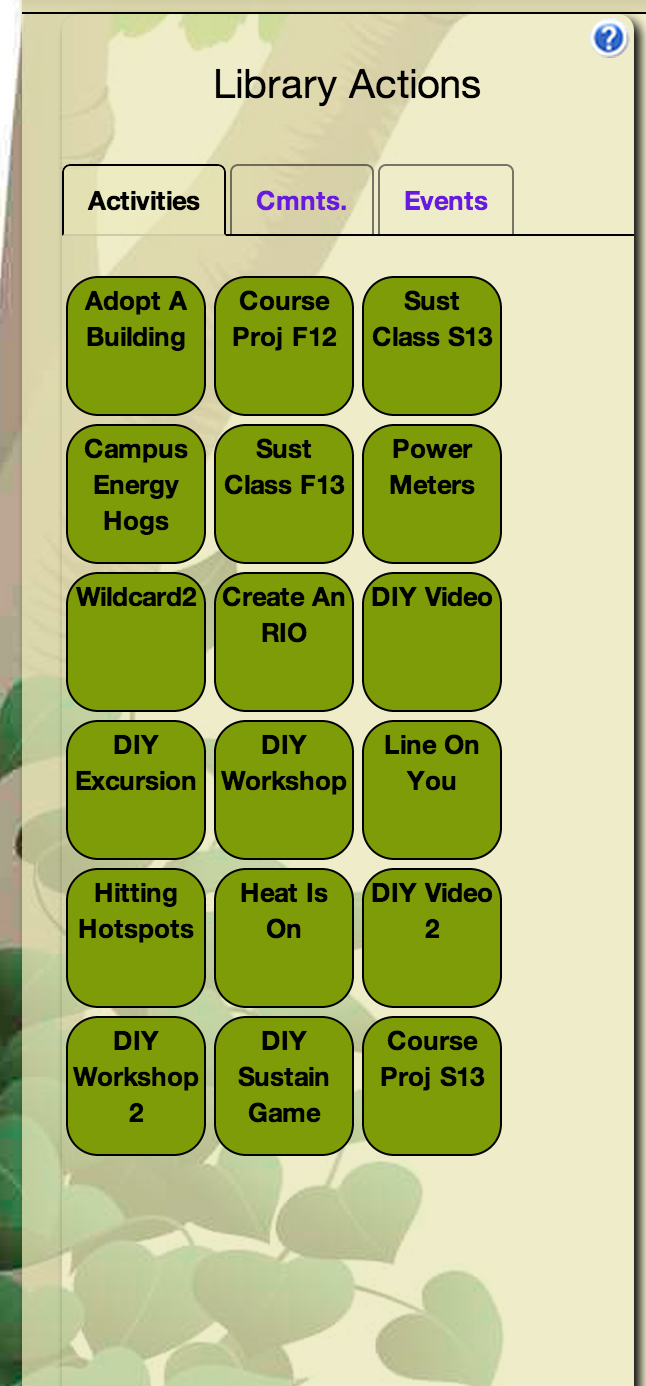
These are actions we’ve used in previous Kukui Cups and are good examples. Clicking on the name of an action takes you to the admin interface where you can edit the action. Right mouse clicking on the action pops up a menu of choices allowing you to copy the action or pre-view the action. You can drag these library actions into the Designer Grid. When you drag a Library Action into the Designer Grid Makahiki creates a new Designer Action in the current draft. If the Action is an Event you will be asked to provide the event date and location.
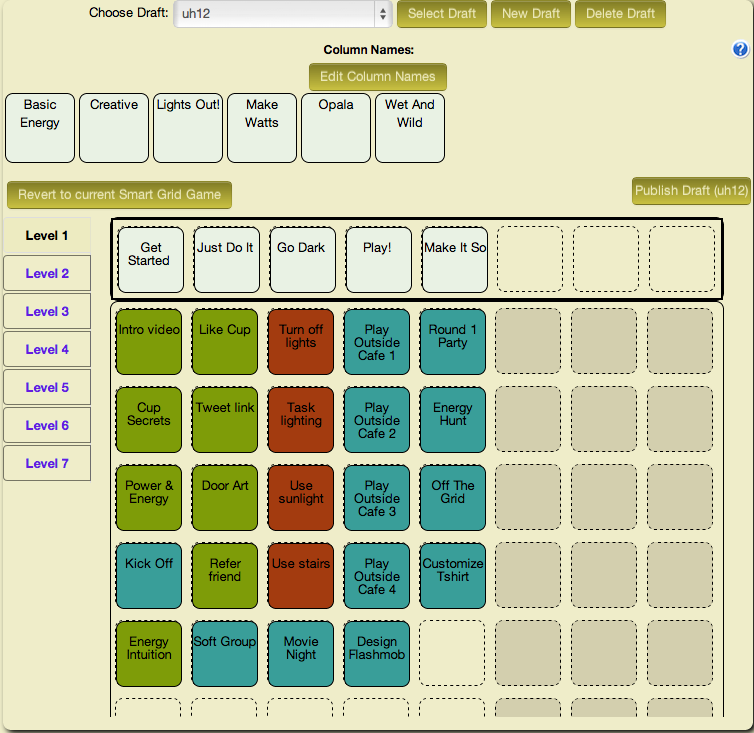
The Designer Grid has four sections, draft choice, library column names, control buttons, and grid.
- The Draft choice row allows you to select the draft you want to work on, create a brand new draft, or delete the current draft.
- The Library Column Names holds the predefined column names we’ve used in previous Kukui Cups. You can drag these columns to the grid activating the column.
- The control buttons allow you to revert to the current Smart Grid Game or Publish the current draft in the Designer to the Smart Grid Game.
- Reverting to the current Smart Grid Game erases the contents of the Designer and copies the Smart Grid Game into the current draft.
- Publishing the Designer runs the GCC checking for any errors in the current draft. A dialog box shows the GCC results. If there are no errors you can publish the draft to the Smart Grid Game. At this point you can decide to use Fillers to fill out the grid or just leave blanks in the grid. The Smart Grid Game is live any players will immediately see the changes to the Smart Grid Game.
- The Grid represents the Smart Grid Game. Levels are on the left (They are at the top of the Smart Grid Game). Each level has up to eight columns and eight rows holding the grid of actions. Clicking on the column names or grid actions takes you to an editor.
Clicking on the names of the Designer Actions takes you to the admin interface where you can edit the contents of the action. Right mouse clicking on the action pops up a menu allowing you to copy the Designer Action, delete the Designer Action or preview the Designer Action.
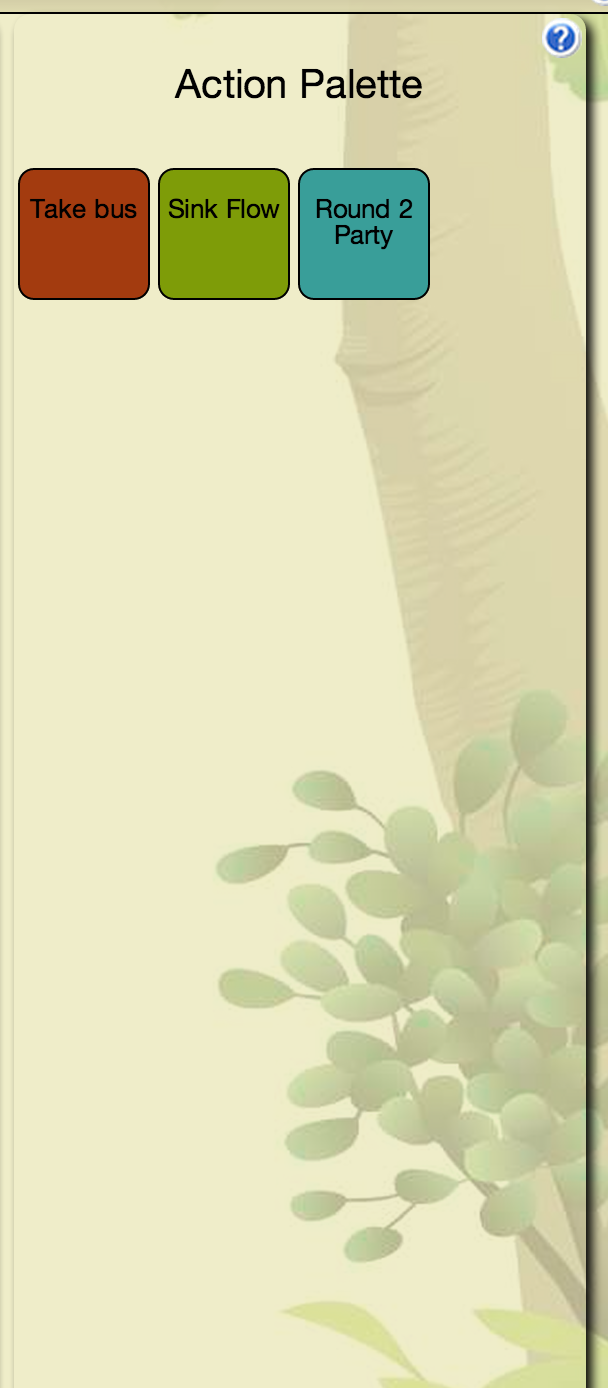
The third column of the Designer Widget is the Action Palette. The Action Palette hold Actions that are not currently in the Smart Grid Game, but may be used at a later time. It is also useful for moving an action from one level to another.
2.3.6.3.4.2. Grid Consistency Checker (GCC) Tools
The second section is a set of Grid Consistency Checker (GCC) Tools shown in the next figure.
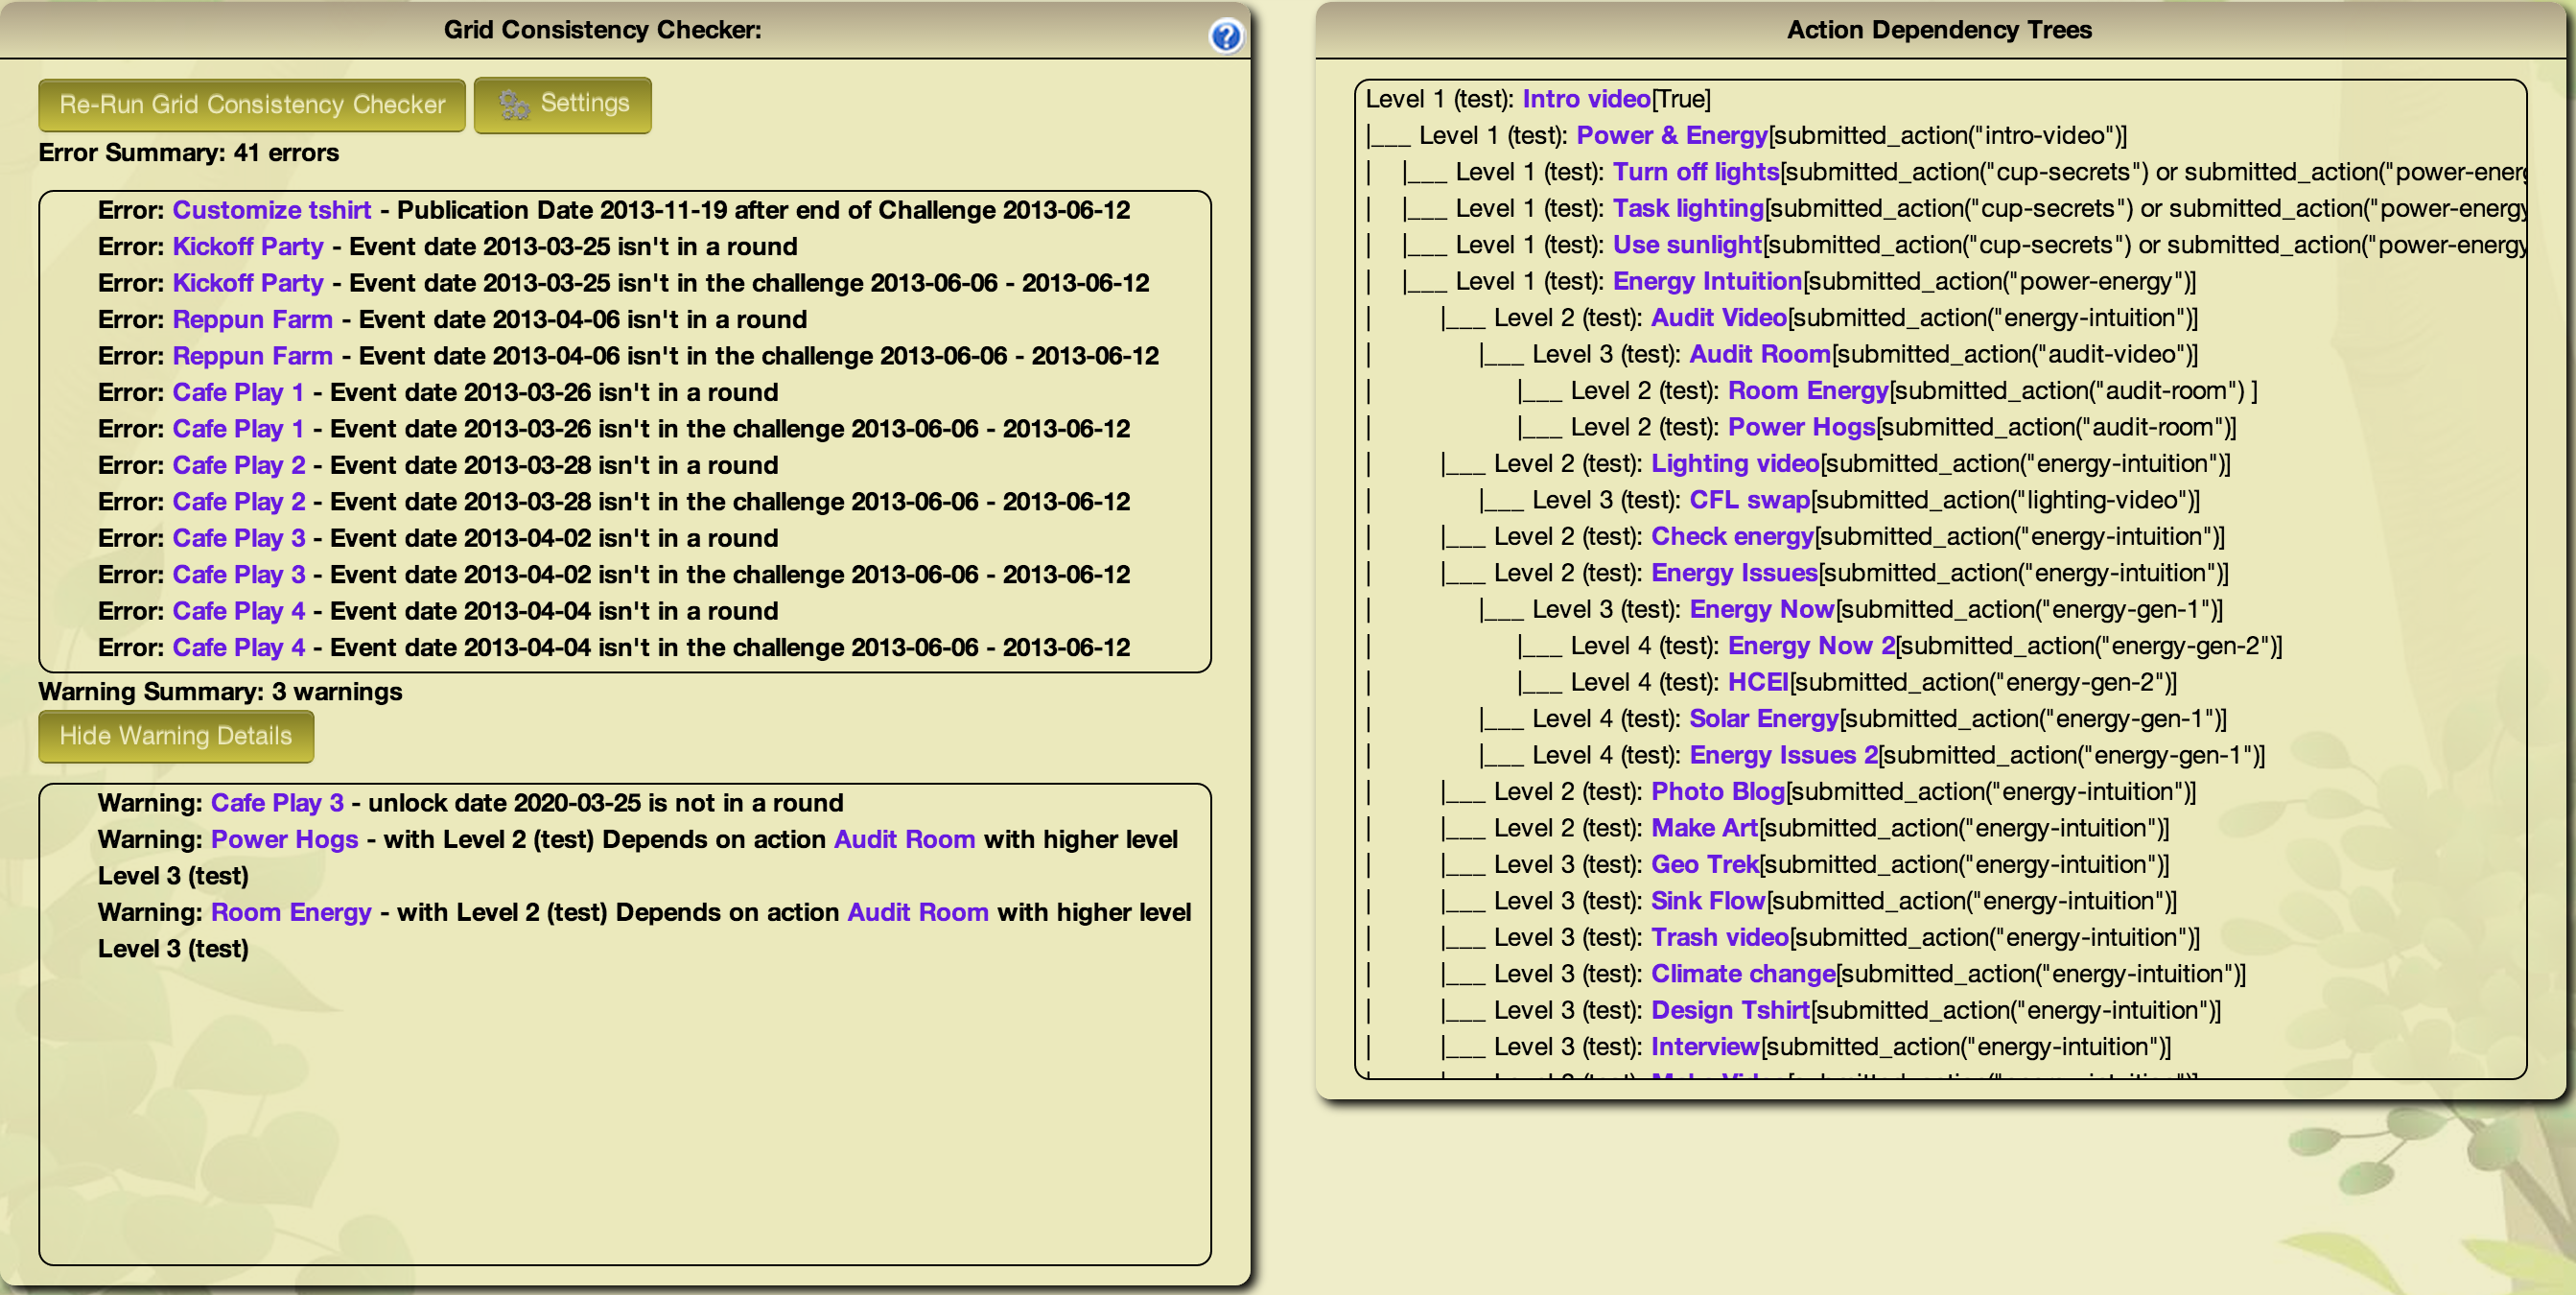
The left-hand side of the GCC section shows the results of running the GCC on the current draft.
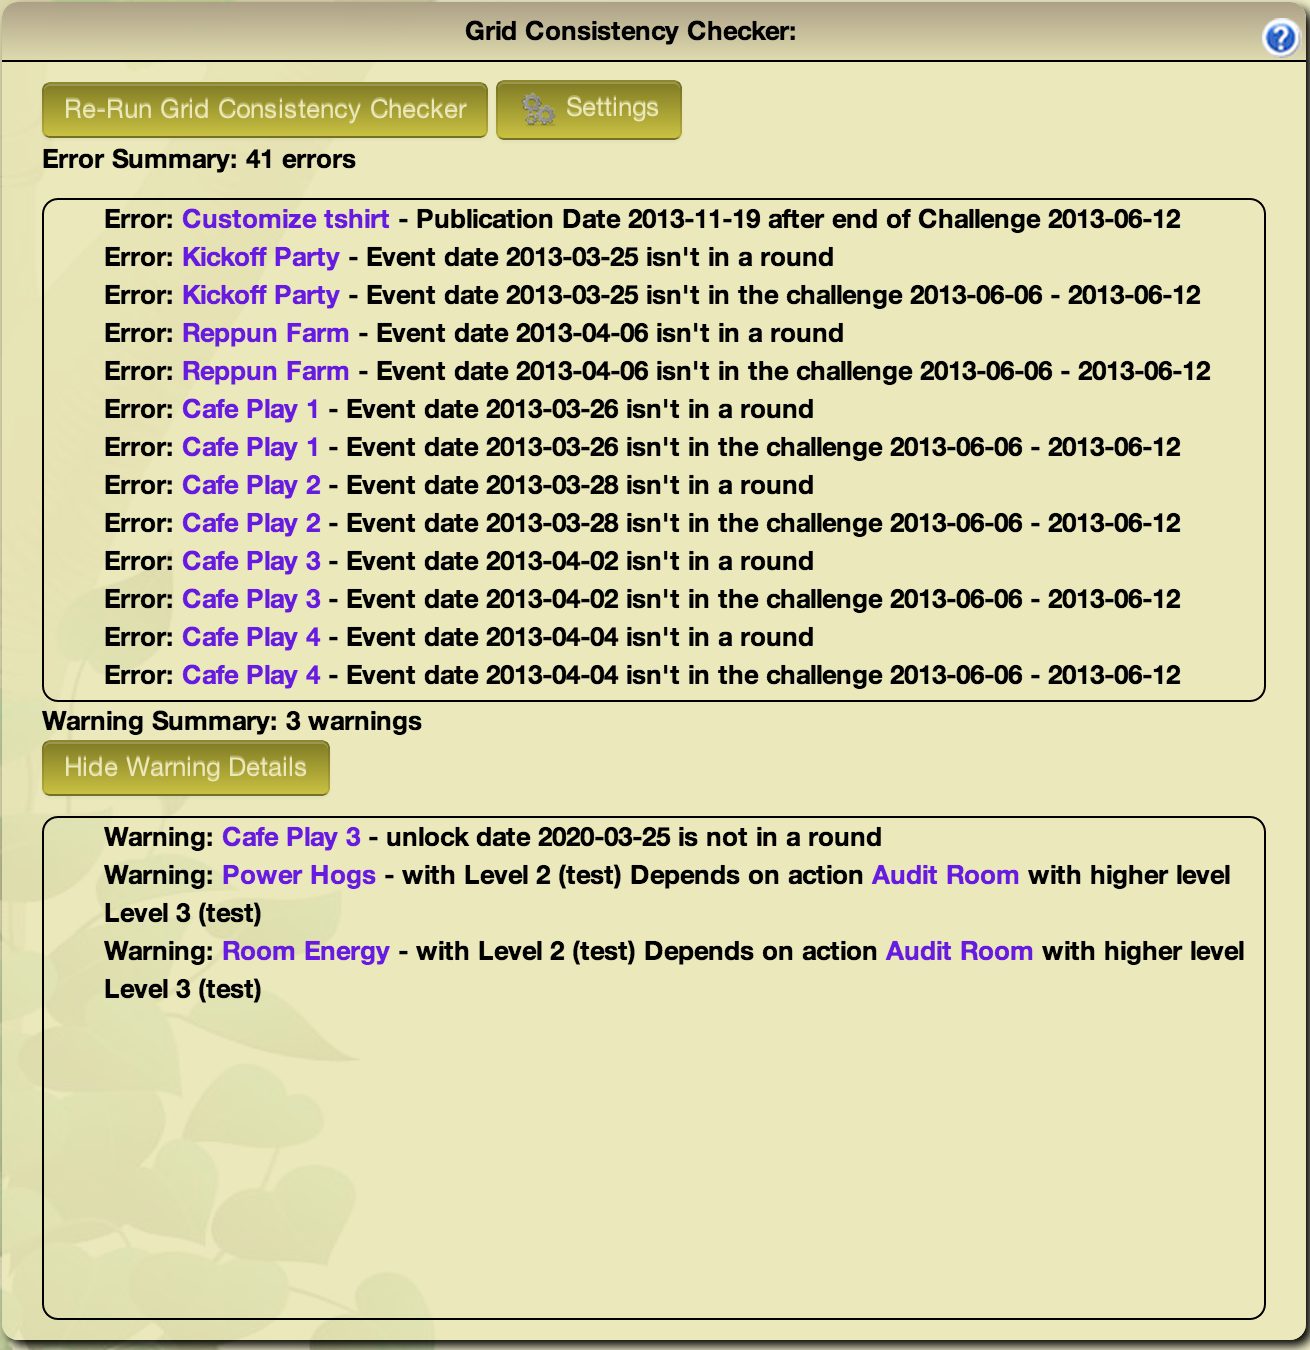
The Re-Run Grid Consistency Checker button re-runs the GCC, updating the errors and warnings. The Settings button pops up a dialog box allowing you to select which checks the GCC runs.
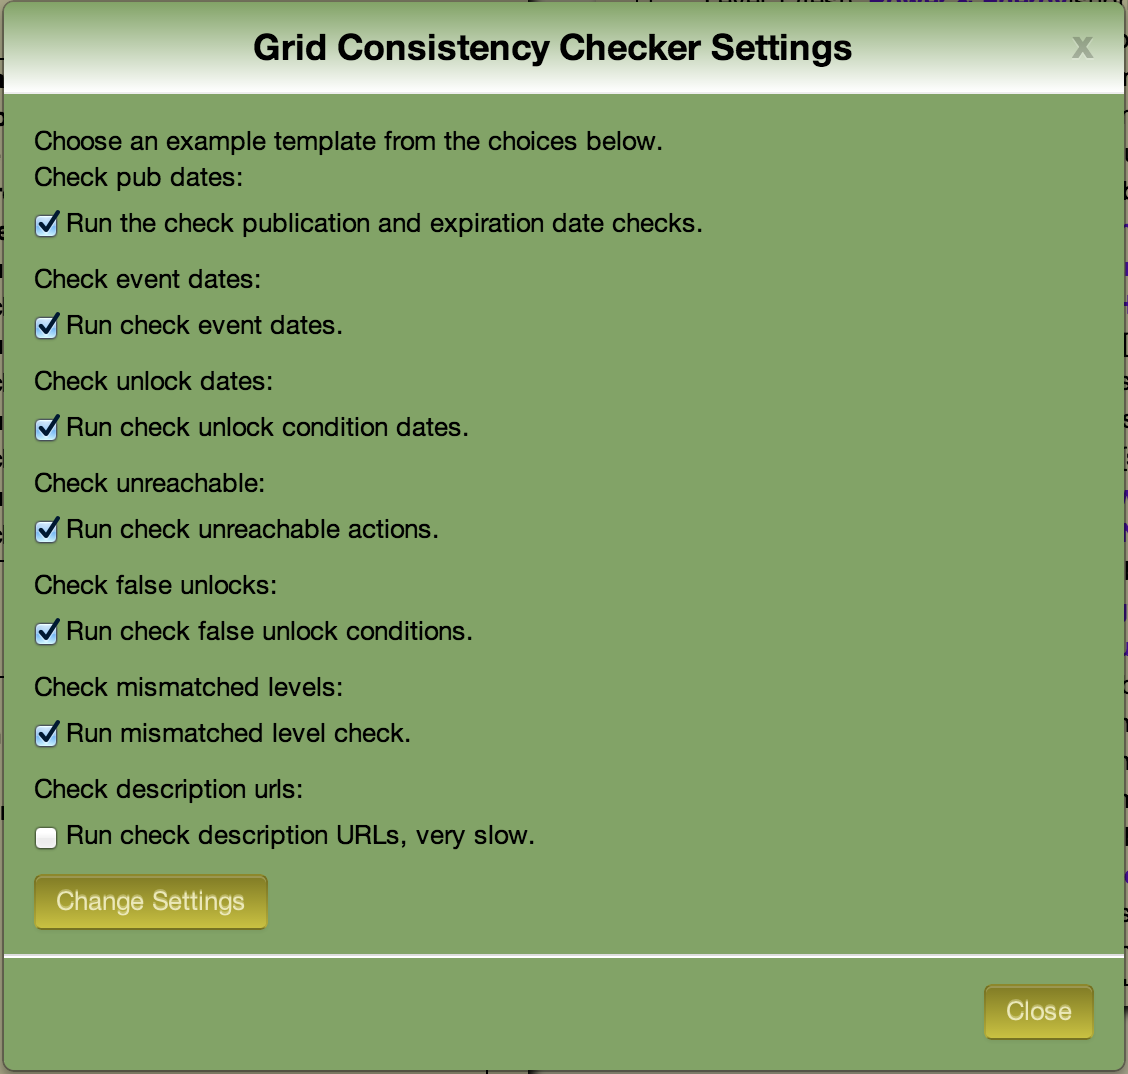
Generally, you should keep all the checks enabled except ‘Check description URLs’. Check description URLs validates URLs in the Action descriptions checking for valid HTTP return codes. This check is very, very slow.
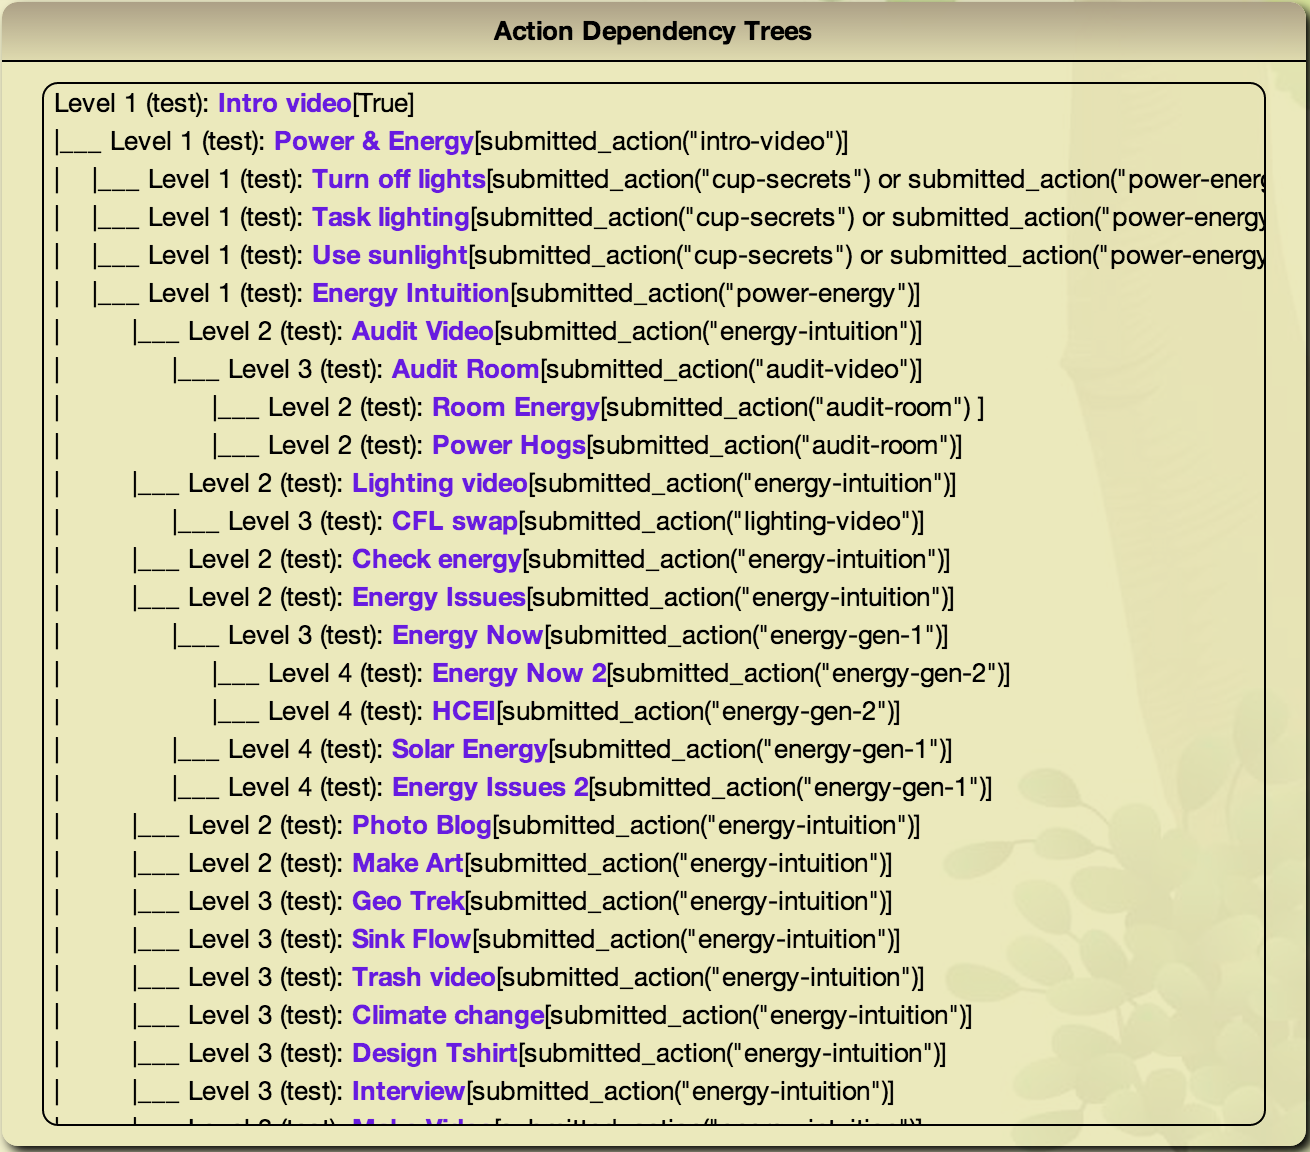
The right-hand side of the GCC section shows the dependency tree or path through the actions. This panel is scrollable.
2.3.6.3.4.3. Using The Smart Grid Game Designer
2.3.6.3.4.3.1. Step 1: Design your initial content
To complete this design step: You need to drag the Library Actions into the grid or copy existing Designer Actions in the grid. Then edit the Designer Actions.
There are several different approaches to selecting your content.
- You can start with an empty grid, then create the levels and add the columns then drag the library actions into the grid. After the Designer Actions are in place you can edit them.
- You can drag your selected content into the palette. Then edit the Designer Actions. Create the levels and columns then later locate the actions in the grid.
- Using your content document from Step 1, mark off each action as you drag it into the grid and edit the Designer Action.
In all the approaches above you should ensure that you edit the action so that it matches the titles, descriptions, point values, and verification questions of your proposed content. Clicking the name of the action in the grid takes you to the admin interface where you can edit the contents of the action. Remember to Save your changes.
2.3.6.3.4.3.2. Step 2: Design the “paths” that players take through the SGG
To complete this design step: Edit the Designer Action’s unlock condition field in the admin interface.

Note
We are working on a SGG dependency editor interface that will greatly simplify the process of creating the “paths”. We hope to release it in Q3 of 2013.
The unlock condition uses the Makahiki Supported Predicates and boolean operators to indicate what actions or conditions must be true to unlock the current action. There are several very useful predicates:
submitted_action: This predicate has one parameter the slug for the action must be attempted before unlocking. Attempted means that the player hit the ‘I Did This’ button and submitted their answer. It does not mean that a Challenge Admin approved the answer. The figure above shows two submitted_action predicates.
unlock_on_date: This predicate is true if the current date is after the given date.
unlock_on_date('03/15/13') will evaluate to true after the Fifteenth of March 2013.
unlock_on_event: This predicate allows you to unlock an event based upon its event date. The predicate has two optional parameters days and lock_after_days. days should be a negative number and is the number days before the event date to unlock the event. lock_after_days will lock the event after the event date.
For example if an event had an event date of ‘03/15/13’ and the unlock condition was unlock_on_event(days=-3, lock_after_days=2) the event would be unlocked from 03/12/13 til 03/17/13.
approved_action: This predicate is very similar to submitted_action, but is only true when a Challenge Admin has approved the player’s answer.
If in your design an action has no dependencies, its unlock condition should be ‘True’. This makes it a “seed” action and will be always unlocked.
You can use boolean operators to make more complex dependencies. For example:
submitted_action('tweet-link') and unlock_on_date('03/15/13') will only be true after March 15th, 2013 and if the player had submitted the Tweet about Kukui Cup activity.
Note
We do not recommend you to use complex boolean logic since it is very difficult to ensure that it will work properly.
2.3.6.3.4.3.3. Step 3: Decide which activities support the “social bonus”
To complete this design step: Edit the actions that have the social bonus setting their Social Bonus Points value.

Be sure to save your changes.
2.3.6.3.4.3.4. Step 4: Design the layout
To complete this design step: Implement your spreadsheet or paper grid.
First, create the level(s) in your grid.
- Right mouse click on any of the Levels to get a popup menu. The menu allows you to delete the current level or create a new level.
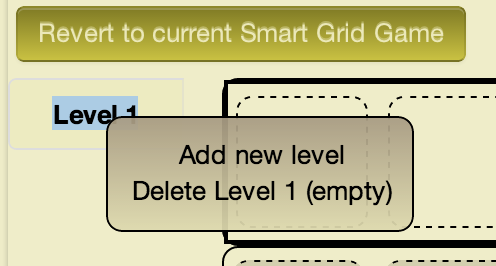
- Deleting a level moves all the actions in the level to the palette.
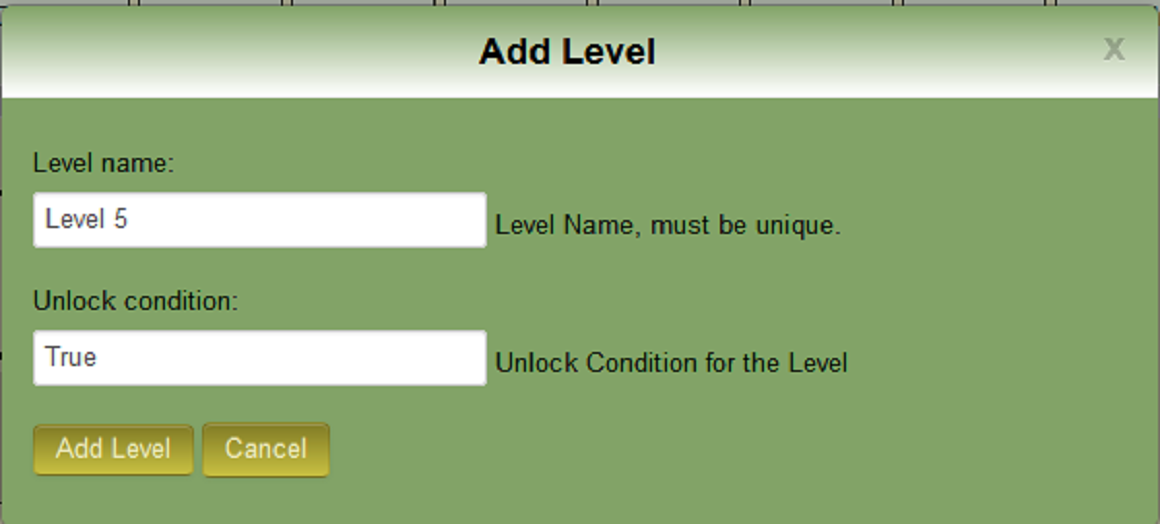
- Adding a new level creates an empty level. Just supply the unique new level name and a predicate for the unlock condition.
Second, fill the level(s) based upon your design.
1. Drag a column name to the first row of the Designer Grid. This will enable the column. Column names must be unique per level. Keep dragging column names untill you are satisfied with the columns.
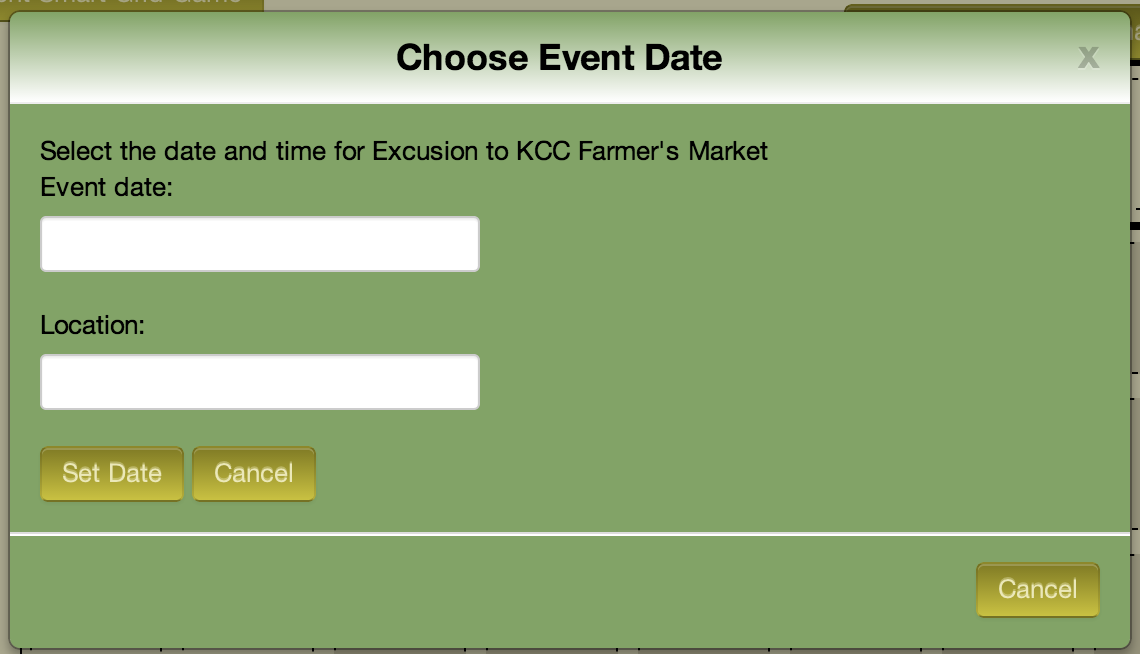
2. Drag a Library Activity, Commitment, or Event into the enabled columns. This will create a Designer Activity, Commitment, or Event. When you drag an Event, Makahiki will ask you for the Event date and location.
The finished level:
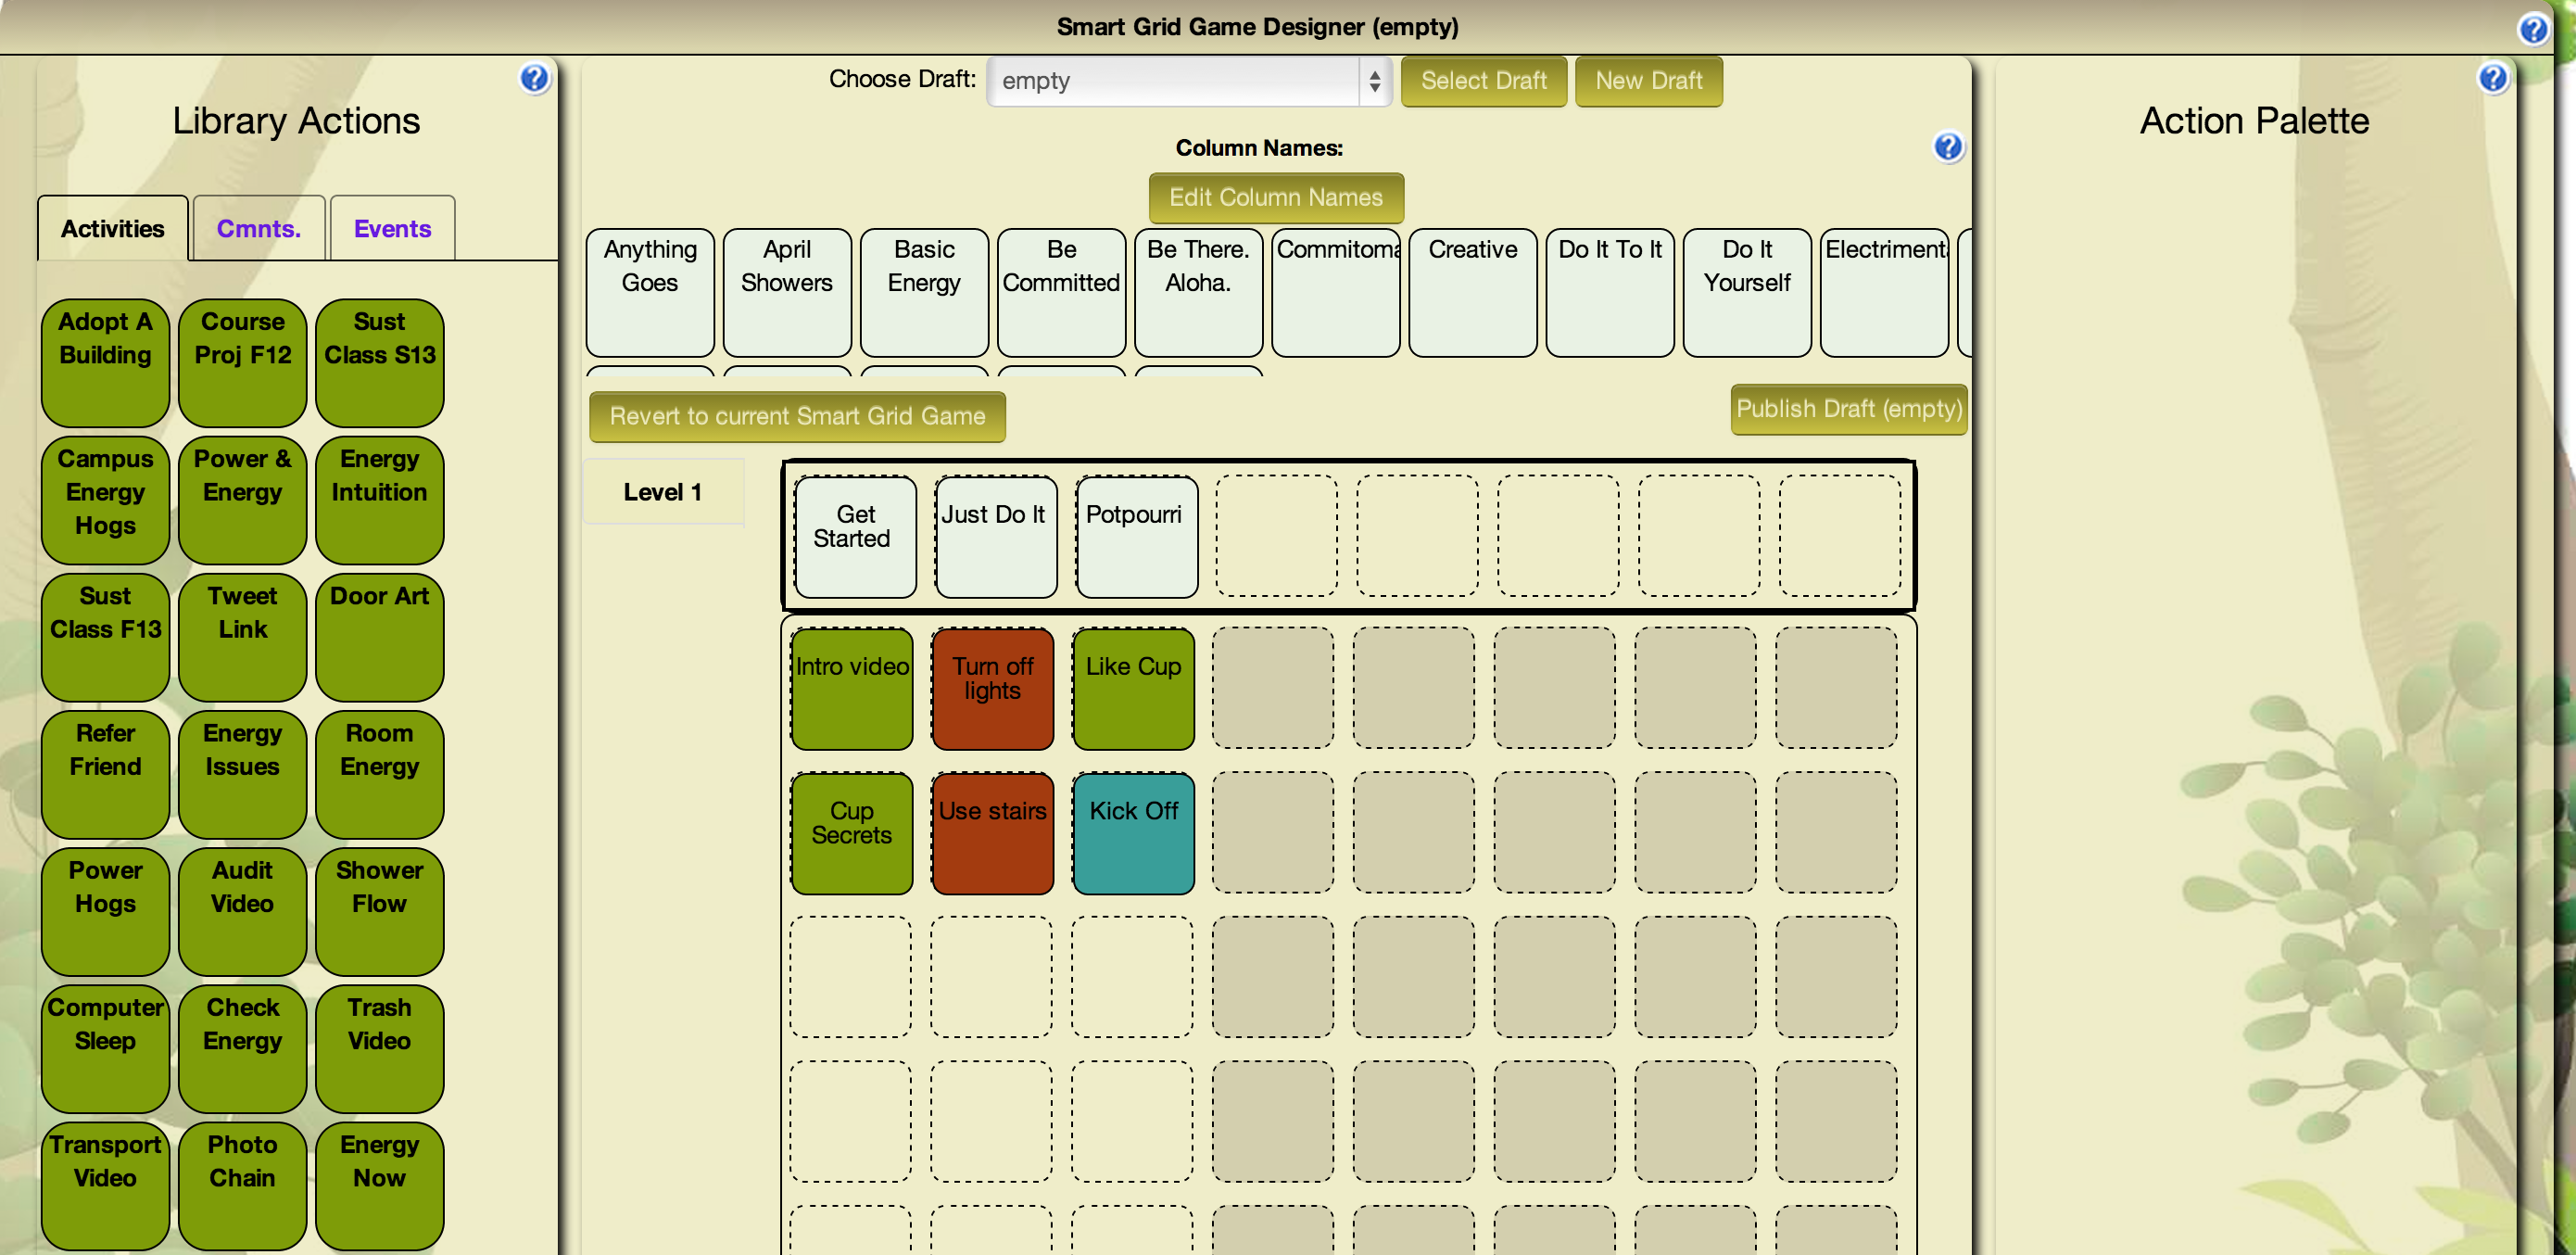
3. Edit the Designer Actions by clicking on the action names. Make sure the contents of the actions is what you want. Pay attention to the unlock_conditions from step 2 and the Social Bonus Points from step 3.
4. Check your Designer Grid by running the GCC. Fix any errors. Check the warnings they may be issues or not.
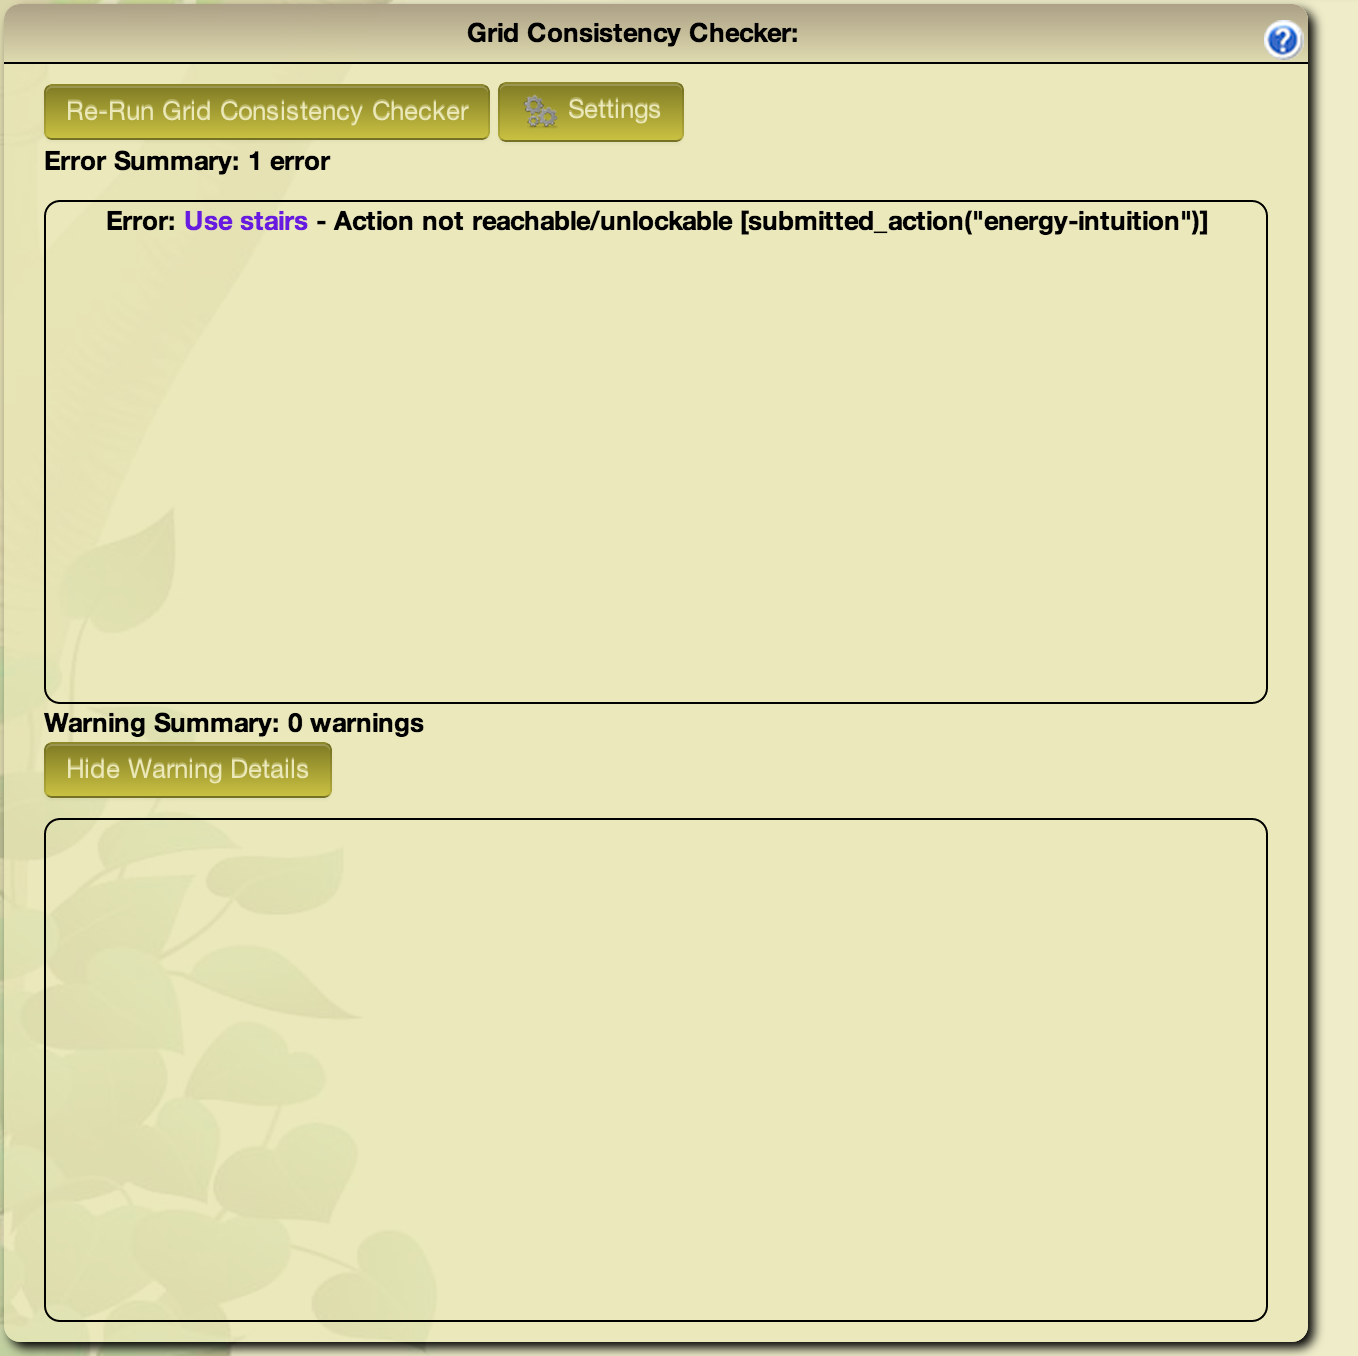
In this example we have one error. The commitment ‘Use Stairs’ will not unlock since it depends upon the action ‘energy-intuition’, but energy-intuition is not in the grid. We have a couple of options to fix this problem:
- Change Use Stairs’ unlock condition to be dependent on something in the grid.
- Add the action ‘energy-intuition’ to the grid.
5. Try to publish your Designer Grid to the Smart Grid Game by pressing the ‘Publish Draft’ button. Makahiki runs the GCC on your grid before publishing the grid. If there are no errors in your grid you will be able to pubulish your grid. If you want fillers in your grid make sure the “Use Fillers” checkbox is checked when you publish. Otherwise the empty grid locaiton will be empty in the Smart Grid Game.
2.3.6.3.5. Verifying your Smart Grid Game
Once you have published your SGG, it is good to “playtest” the game. Go through each of the actions, and make sure they display correctly. Complete the initial actions to make sure that new actions get unlocked appropriately.
For large scale challenges, we recommend that you run a prior “pilot” challenge in which you select just a few people to play through the game and look for problems with your design.
Coming Soon Designer play tester.